During this month, I have worked on the following tasks for Debian LTS and ELTS. This was my first month as LTS/ELTS contributor, including technical onboarding and initial setup of workflows. Thanks to Freexian and sponsors for making this possible [0].
Automatisierung ist der Schlüssel zur Effizienzsteigerung in der modernen Arbeitswelt. Besonders bei der Verwaltung großer Datenmengen oder sich wiederholender Aufgaben kann die Automatisierung erhebliche Vorteile bieten. LibreOffice, eine der führenden freien Office-Suiten, bietet vielfältige Möglichkeiten, um Arbeitsabläufe durch Automatisierung zu optimieren, insbesondere auf dedizierten Servern. Dieser Beitrag beleuchtet, wie erweiterte Automatisierungstechniken in LibreOffice eingesetzt werden können, um die Effizienz zu maximieren.
Herausforderungen in der Büroautomatisierung
In vielen Unternehmen sind Office-Programme unverzichtbare Werkzeuge. Dennoch gibt es Herausforderungen, die die Effizienz beeinträchtigen können. Manuelle Datenverarbeitung ist zeitaufwändig und fehleranfällig. Wiederholte Eingaben und Formatierungen beanspruchen wertvolle Ressourcen und können die Produktivität erheblich senken. Diese Probleme werden noch komplexer, wenn große Datenmengen auf dedizierten Servern verarbeitet werden müssen, wo Geschwindigkeit und Zuverlässigkeit entscheidend sind.
Die Rolle dedizierter Server
Dedizierte Server bieten eine leistungsstarke Plattform zur Verarbeitung komplexer Aufgaben. Sie ermöglichen es, große Datenmengen effizient zu verwalten und zu verarbeiten. Doch ohne geeignete Automatisierungstechniken kann das volle Potenzial dieser Server nicht ausgeschöpft werden. Hier setzt die Automatisierung mit LibreOffice an, um diese Herausforderungen zu meistern und die Effizienz zu steigern.
Automatisierungstechniken in LibreOffice
LibreOffice bietet verschiedene Möglichkeiten zur Automatisierung, die von einfachen Makros bis hin zu komplexen Skripten reichen. Diese Techniken helfen, Routineaufgaben zu automatisieren und die Konsistenz der Datenverarbeitung zu gewährleisten.
Makros und Skripte
Makros sind eine der einfachsten Methoden zur Automatisierung in LibreOffice. Sie ermöglichen es, wiederkehrende Aufgaben mit einem einzigen Klick auszuführen. Ein einfaches Makro zur Automatisierung könnte beispielsweise so aussehen:
Sub SimpleMacro
MsgBox "Dies ist ein automatisierter Prozess!"
End Sub
Für komplexere Automatisierungen bieten sich Skripte in Python oder JavaScript an. Diese Skripte können komplexe Berechnungen durchführen oder Daten aus verschiedenen Quellen integrieren. Durch die Nutzung dieser Skripte auf dedizierten Servern kann die Verarbeitungsgeschwindigkeit erheblich gesteigert werden.
Integration mit Datenbanken
Eine weitere Möglichkeit zur Effizienzsteigerung ist die Integration von LibreOffice mit externen Datenbanken. Dies ermöglicht den automatisierten Import und Export von Daten, wodurch manuelle Eingaben minimiert werden. Beispielsweise kann ein Skript automatisch Daten aus einer SQL-Datenbank abrufen, analysieren und in einem LibreOffice Calc-Dokument darstellen.
Implementierung auf dedizierten Servern
Die Implementierung von Automatisierungstechniken auf dedizierten Servern erfordert eine gezielte Planung und Ausführung. Hierbei spielen Skalierung und Sicherheit eine entscheidende Rolle.
Skalierung und Leistung
Um die Leistung zu maximieren, sollten Automatisierungsprozesse so konzipiert werden, dass sie die Ressourcen des Servers optimal nutzen. Dazu gehört die parallele Verarbeitung von Aufgaben und die effiziente Nutzung von Speicher und CPU. Ein Beispiel für eine skalierbare Lösung ist die Nutzung von Docker-Containern, um LibreOffice-Instanzen in isolierten Umgebungen auszuführen. Dies ermöglicht es, mehrere Prozesse gleichzeitig zu betreiben, ohne dass es zu Ressourcenengpässen kommt.
Sicherheit und Wartung
Sicherheit ist ein wesentlicher Aspekt bei der Automatisierung auf dedizierten Servern. Es ist wichtig, dass alle Automatisierungsprozesse regelmäßig auf Sicherheitslücken überprüft werden. Zudem sollten Backups und Wiederherstellungspläne vorhanden sein, um Datenverlust zu vermeiden.
Vorteile der Automatisierung
Die Implementierung erweiterter Automatisierungstechniken in LibreOffice bietet zahlreiche Vorteile, die weit über die reine Effizienzsteigerung hinausgehen.
Zeitersparnis: Automatisierung reduziert die Notwendigkeit manueller Eingaben und ermöglicht es, komplexe Aufgaben in kürzerer Zeit zu erledigen.
Fehlerreduktion: Durch die Automatisierung werden menschliche Fehler minimiert, was die Genauigkeit der Datenverarbeitung erhöht.
Kosteneffizienz: Die Reduzierung der benötigten Arbeitszeit führt zu einer Senkung der Betriebskosten.
Skalierbarkeit: Automatisierte Prozesse lassen sich leicht an wachsende Datenmengen anpassen, ohne dass die Leistung darunter leidet.
Vergleichstabelle: Vorher und Nachher der Automatisierung
Kriterium
Vor Automatisierung
Nach Automatisierung
Bearbeitungszeit
Hoch
Niedrig
Fehlerquote
Hoch
Niedrig
Betriebskosten
Hoch
Gering
Durch die gezielte Implementierung von Automatisierungstechniken in LibreOffice können Unternehmen ihre Effizienz erheblich steigern und gleichzeitig die Qualität ihrer Datenverarbeitung verbessern. Dedizierte Server bieten die ideale Plattform, um diese Techniken effektiv einzusetzen und das volle Potenzial von LibreOffice auszuschöpfen.
Erweiterte Automatisierungsmöglichkeiten in LibreOffice
LibreOffice bietet nicht nur grundlegende Makros und Skripte, sondern auch eine Vielzahl erweiterter Automatisierungsmöglichkeiten, die es ermöglichen, noch komplexere Aufgaben effizient zu bewältigen. Diese Techniken erfordern ein tieferes Verständnis der LibreOffice-APIs und können maßgeschneiderte Lösungen für spezifische Geschäftsanforderungen schaffen.
UNO-API für erweiterte Anpassungen
Die Universal Network Objects (UNO)-API von LibreOffice ist eine leistungsstarke Möglichkeit, um tief in die Automatisierung von Prozessen einzutauchen. Sie erlaubt es Entwicklern, benutzerdefinierte Funktionen zu erstellen, die weit über die Möglichkeiten einfacher Makros hinausgehen. Mit der UNO-API können beispielsweise individuelle Benutzeroberflächen angepasst oder spezielle Datenverarbeitungsroutinen implementiert werden. Dadurch lässt sich die Software perfekt an die spezifischen Bedürfnisse eines Unternehmens anpassen.
Verwendung von Batch-Prozessen
Batch-Prozesse sind ein weiterer Ansatz zur Automatisierung, der besonders auf dedizierten Servern effektiv eingesetzt werden kann. Sie ermöglichen die Verarbeitung großer Datenmengen in einem einzigen Durchlauf, ohne dass ein menschliches Eingreifen erforderlich ist. Ein typisches Szenario wäre das nächtliche Generieren von Berichten oder die Aktualisierung von Datenbanken, während die Serverauslastung gering ist. Diese Prozesse können so geplant werden, dass sie außerhalb der regulären Arbeitszeiten stattfinden, um die Ressourcen optimal zu nutzen.
Automatisierte Dokumentenverarbeitung
Ein häufiges Einsatzgebiet für die Automatisierung in LibreOffice ist die automatisierte Verarbeitung von Dokumenten. Dazu gehört das Generieren von Serienbriefen, das Zusammenführen von Dokumenten oder das Konvertieren von Dateien in verschiedene Formate. Diese Aufgaben können durch Automatisierung nicht nur schneller, sondern auch konsistenter erledigt werden. Beispielsweise kann ein Skript erstellt werden, das automatisch alle relevanten Informationen aus einer Datenbank zieht und sie in ein vordefiniertes Dokument einfügt.
Best Practices für die Automatisierung
Die Implementierung fortschrittlicher Automatisierungstechniken erfordert sorgfältige Planung und Durchführung. Es gibt einige Best Practices, die Unternehmen berücksichtigen sollten, um den Erfolg ihrer Automatisierungsprojekte sicherzustellen.
Iterative Entwicklung und Testing
Automatisierungslösungen sollten schrittweise entwickelt werden, um Fehler frühzeitig zu erkennen und zu beheben. Es ist ratsam, zunächst mit einem kleinen, überschaubaren Projekt zu beginnen und die Lösung schrittweise zu erweitern. Regelmäßiges Testing ist unerlässlich, um sicherzustellen, dass alle automatisierten Prozesse wie erwartet funktionieren und keine unerwarteten Probleme verursachen.
Schulung und Weiterbildung
Die Einführung neuer Automatisierungstechniken erfordert oft eine Umstellung der Arbeitsweise. Mitarbeiter sollten entsprechend geschult werden, um die neuen Systeme effektiv nutzen zu können. Dies umfasst sowohl die Bedienung der automatisierten Prozesse als auch ein grundlegendes Verständnis der zugrunde liegenden Technologien, um bei Bedarf Anpassungen vornehmen zu können.
Dokumentation und Wissensmanagement
Eine umfassende Dokumentation ist entscheidend für den langfristigen Erfolg von Automatisierungsprojekten. Alle entwickelten Skripte, Makros und Prozesse sollten detailliert dokumentiert werden, um sicherzustellen, dass sie auch von anderen Teammitgliedern verstanden und gewartet werden können. Ein effektives Wissensmanagement hilft, das gesammelte Wissen zu bewahren und neuen Mitarbeitern zugänglich zu machen.
Beispiele aus der Praxis
Viele Unternehmen haben bereits erfolgreich Automatisierungstechniken in LibreOffice implementiert und konnten dadurch signifikante Verbesserungen in ihrer Effizienz und Datenverarbeitung erzielen.
Fallstudie: Finanzberichtserstellung
Ein mittelständisches Unternehmen im Finanzsektor nutzte die Automatisierung in LibreOffice, um den Prozess der Finanzberichtserstellung zu optimieren. Vor der Automatisierung wurden die Berichte manuell erstellt, was zu Inkonsistenzen und Verzögerungen führte. Durch die Implementierung automatisierter Skripte, die Daten aus verschiedenen Quellen zusammenführten und in standardisierte Berichtsvorlagen einfügten, konnte die Bearbeitungszeit um über 50% reduziert und die Genauigkeit der Berichte erheblich gesteigert werden.
Fallstudie: Verwaltung von Kundendaten
Ein weiteres Beispiel ist ein Einzelhandelsunternehmen, das die Automatisierung nutzte, um seine Kundendaten effizienter zu verwalten. Durch die Integration von LibreOffice mit der bestehenden CRM-Datenbank konnte das Unternehmen den Prozess der Datenaktualisierung automatisieren, was zu einer verbesserten Datenqualität und einer personalisierteren Kundenansprache führte.
Durch den Einsatz von Automatisierungstechniken in LibreOffice auf dedizierten Servern können Unternehmen nicht nur ihre Effizienz steigern, sondern auch die Qualität ihrer Geschäftsprozesse verbessern. Die vielfältigen Möglichkeiten, die LibreOffice bietet, ermöglichen es, maßgeschneiderte Lösungen für unterschiedlichste Anforderungen zu entwickeln. Die sorgfältige Planung, Implementierung und Wartung dieser Systeme ist der Schlüssel zum Erfolg in der modernen, datengetriebenen Geschäftswelt.
During this month, I have worked on the following tasks for Debian LTS and ELTS. This was my initial contact with the LTS/ELTS project and preparation of security updates. Thanks to Freexian and sponsors for making this possible [0].
Die Leistung von OwnCloud auf dedizierten Root-Servern zu maximieren, erfordert gezielte Netzwerkoptimierung. Der Einsatz eines dedizierten Servers bietet Ihnen die Kontrolle und Kapazität, um Ihre OwnCloud-Installation zu einem leistungsstarken und effizienten Werkzeug zu machen. Ein optimiertes Netzwerk ist der Schlüssel, um die volle Bandbreite der Möglichkeiten auszuschöpfen, die Ihnen eine solche Infrastruktur bietet.
Leistungsverbesserung durch Netzwerkarchitektur
Die Netzwerkarchitektur bildet das Fundament jedes OwnCloud-Hostings. Durch den gezielten Einsatz von Load Balancing und Caching-Techniken können Sie die Effizienz und Geschwindigkeit Ihrer Server erheblich steigern. Load Balancing sorgt dafür, dass der Datenverkehr gleichmäßig auf alle verfügbaren Ressourcen verteilt wird, wodurch Engpässe vermieden und Reaktionszeiten verkürzt werden.
Caching ist eine weitere Methode, die Ihnen hilft, die Netzwerklast zu reduzieren. Durch das Zwischenspeichern häufig abgefragter Daten direkt im Speicher können Sie die Serverlast verringern und die Antwortzeiten der Cloud spürbar verbessern. Eine Kombination aus Varnish Cache und Redis bietet hier optimale Ergebnisse. Während Varnish Cache statische Inhalte schnell bereitstellen kann, eignet sich Redis ideal für das Zwischenspeichern von Sitzungsdaten und anderen dynamischen Inhalten.
Technische Implementierung von Load Balancing und Caching
Load Balancing kann durch den Einsatz von NGINX oder HAProxy erreicht werden. Beide Lösungen bieten robuste Funktionen, um den Datenfluss effizient zu steuern.
Varnish Cache wird durch eine einfache Konfiguration in die bestehende Serverarchitektur integriert. Es ist wichtig, die TTL (Time to Live) der gecachten Inhalte auf die Bedürfnisse Ihrer Nutzer abzustimmen.
Redis als In-Memory-Datenbank kann sowohl für das Caching von Datenbankabfragen als auch für die Speicherung von Sitzungsdaten eingesetzt werden.
Sicherheit und Stabilität durch Netzwerküberwachung
Die Sicherheit und Stabilität Ihrer OwnCloud-Installation auf einem dedizierten Root-Server hängen maßgeblich von einer effektiven Netzwerküberwachung ab. Durch den Einsatz von Monitoring-Tools wie Zabbix oder Prometheus können Sie die Performance Ihrer Server in Echtzeit überwachen und Engpässe frühzeitig erkennen. Diese Tools bieten Ihnen detaillierte Einblicke in den Netzwerkverkehr und ermöglichen es Ihnen, gezielte Maßnahmen zur Optimierung zu ergreifen.
Ein weiterer wichtiger Aspekt ist die Implementierung von Firewalls und Intrusion Detection Systemen (IDS). Eine gut konfigurierte Firewall schützt Ihre Server vor unbefugtem Zugriff und sorgt dafür, dass nur autorisierte Nutzer auf Ihre OwnCloud-Installation zugreifen können. Ein IDS ergänzt diese Schutzmaßnahmen, indem es verdächtige Aktivitäten im Netzwerk erkennt und Sie rechtzeitig warnt.
Regelmäßige Updates und Patches sind unerlässlich, um Sicherheitslücken zu schließen und die Stabilität Ihrer OwnCloud-Installation zu gewährleisten.
Die Implementierung von SSL/TLS-Zertifikaten sorgt dafür, dass alle Datenübertragungen verschlüsselt und gegen unbefugten Zugriff geschützt sind.
Die Nutzung von VPNs kann den Zugang zu Ihrer OwnCloud-Installation weiter absichern, indem der Datenverkehr durch einen sicheren Tunnel geleitet wird.
Effizienzsteigerung durch Automatisierung und Skripting
Automatisierung ist ein wesentlicher Schlüssel zur Effizienzsteigerung bei der Verwaltung von OwnCloud auf dedizierten Root-Servern. Mit Tools wie Ansible oder Puppet können Sie wiederkehrende Aufgaben automatisieren und die Skalierung Ihrer Infrastruktur vereinfachen. Dies spart nicht nur Zeit, sondern minimiert auch die Fehlerquote bei der Verwaltung komplexer Netzwerkkonfigurationen.
Durch das Erstellen und Implementieren von Skripten können Sie Routineaufgaben effizienter gestalten. Von der automatisierten Aktualisierung der Server bis hin zur regelmäßigen Sicherung Ihrer Daten – gut geschriebene Skripte entlasten Ihre IT-Ressourcen und erhöhen die Zuverlässigkeit Ihrer Infrastruktur.
Implementierung von Automatisierungstools
Ansible ermöglicht eine einfache Konfiguration und Verwaltung Ihrer Server durch deklarative Playbooks. Diese Playbooks beschreiben den gewünschten Zustand Ihrer Systeme und lassen sich leicht anpassen und erweitern.
Puppet bietet eine zentrale Verwaltungskonsole, über die Sie Konfigurationsänderungen über eine grafische Oberfläche vornehmen können. Dies ist besonders nützlich in großen Netzwerken mit einer Vielzahl von Knotenpunkten.
Regelmäßige Backups können durch Cron-Jobs und Shell-Skripte automatisiert werden. Dies stellt sicher, dass immer eine aktuelle Sicherung Ihrer Daten verfügbar ist.
ROI durch optimierte OwnCloud-Umgebung
Die Optimierung Ihrer OwnCloud-Installation auf dedizierten Root-Servern bringt nicht nur technische Vorteile, sondern auch einen klaren Return on Investment (ROI). Durch gesteigerte Effizienz und verbesserte Skalierbarkeit können Sie die Betriebskosten senken und die Benutzerzufriedenheit erhöhen. Eine optimierte Netzwerkumgebung sorgt für schnellere Ladezeiten und weniger Ausfallzeiten, was sich direkt auf die Produktivität Ihrer Nutzer auswirkt.
Maßnahme
Vorteil
ROI-Auswirkung
————————
—————————–
——————————–
Load Balancing
Bessere Lastverteilung
Höhere Nutzerzufriedenheit
Caching
Schnellere Datenbereitstellung
Geringere Serverlast
Automatisierung
Weniger manuelle Eingriffe
Kostensenkung durch Effizienz
Die Investition in eine fortschrittliche Netzwerkoptimierung zahlt sich durch verbesserte Leistung und erhöhte Sicherheit aus. Dies ermöglicht es Ihnen, das volle Potenzial Ihrer OwnCloud-Umgebung zu nutzen und langfristige Vorteile zu realisieren.
Erweiterte Netzwerkskalierung und Ressourcenzuweisung
Eine effiziente Ressourcenzuweisung ist entscheidend für die Leistungsfähigkeit Ihrer OwnCloud-Umgebung. Mit der Nutzung von Virtualisierungstechnologien wie Docker oder Kubernetes können Sie Ihre Serverressourcen optimal verteilen und dynamisch anpassen. Diese Technologien ermöglichen es Ihnen, verschiedene Dienste in isolierten Containern auszuführen, was die Flexibilität erhöht und die Komplexität reduziert.
Implementierung von Virtualisierungstechnologien
Docker: Durch die Nutzung von Docker-Containern können Sie Ihre OwnCloud-Instanzen in einer flexiblen und portablen Umgebung betreiben. Docker ermöglicht es Ihnen, Anwendungen schnell zu deployen und zu skalieren, während der Ressourcenverbrauch minimiert wird.
Kubernetes: Für größere Infrastrukturen bietet Kubernetes eine leistungsstarke Plattform zur Orchestrierung von Container-Anwendungen. Es automatisiert die Bereitstellung, Skalierung und Verwaltung von Container-Anwendungen, was besonders vorteilhaft in Multi-Server-Umgebungen ist.
Ressourcenzuweisung: Durch die Definition von Ressourcenlimits und -reservierungen innerhalb von Docker und Kubernetes können Sie sicherstellen, dass Ihre OwnCloud-Instanzen stets die benötigten Ressourcen erhalten, während ungenutzte Kapazitäten für andere Anwendungen freigegeben werden.
Optimierung der Datenbankleistung
Ein weiterer kritischer Aspekt der Optimierung Ihrer OwnCloud-Installation ist die Verbesserung der Datenbankleistung. Da die Datenbank das Rückgrat jeder OwnCloud-Instanz bildet, hat ihre Effizienz einen direkten Einfluss auf die Gesamtleistung des Systems. Die Wahl der richtigen Datenbank und deren Konfiguration kann die Geschwindigkeit und Zuverlässigkeit Ihrer OwnCloud-Umgebung erheblich steigern.
Auswahl und Konfiguration der Datenbank
MySQL/MariaDB: Diese weit verbreiteten Datenbanken bieten robuste und zuverlässige Leistung für OwnCloud-Installationen. Durch das Tuning von Parametern wie `innodb_buffer_pool_size` und `max_connections` können Sie die Performance weiter steigern.
PostgreSQL: Als Alternative bietet PostgreSQL erweiterte Funktionen und eine hervorragende Performance bei komplexen Abfragen. Die Optimierung von Parametern wie `shared_buffers` und `work_mem` kann die Effizienz erheblich verbessern.
Indizes und Query-Optimierung: Durch das Setzen von Indizes auf häufig abgefragte Tabellen und die Optimierung von SQL-Abfragen können Sie die Datenbankzugriffe beschleunigen und die Serverlast reduzieren.
Benutzerverwaltung und Zugriffsrechte
Ein effektives Benutzer- und Rechteverwaltungssystem ist essenziell für die Sicherheit und Effizienz Ihrer OwnCloud-Umgebung. Eine gut strukturierte Verwaltung der Zugriffsrechte stellt sicher, dass Nutzer nur auf die Daten zugreifen können, die für sie bestimmt sind, während die Integrität und Vertraulichkeit sensibler Informationen gewahrt bleibt.
Implementierung eines robusten Zugriffsmanagements
Gruppenrichtlinien: Durch die Verwendung von Gruppenrichtlinien können Sie Benutzern bestimmte Rollen und Berechtigungen zuweisen. Dies vereinfacht die Verwaltung und sorgt für eine klare Struktur innerhalb der Benutzerverwaltung.
Zwei-Faktor-Authentifizierung (2FA): Die Implementierung von 2FA erhöht die Sicherheit Ihrer OwnCloud-Installation erheblich, indem sie einen zusätzlichen Schutzmechanismus für den Benutzerzugriff bietet.
Audit-Logs: Das Führen detaillierter Audit-Logs ermöglicht die Nachverfolgung von Benutzeraktivitäten und die Erkennung potenzieller Sicherheitsvorfälle. Diese Logs sind ein wertvolles Werkzeug zur Einhaltung von Compliance-Vorgaben und zur Analyse von Sicherheitslücken.
Netzwerkredundanz und Ausfallsicherheit
Die Gewährleistung von Netzwerkredundanz und Ausfallsicherheit ist entscheidend, um die Verfügbarkeit Ihrer OwnCloud-Umgebung zu maximieren. Durch den Einsatz von Redundanzstrategien können Sie sicherstellen, dass Ihre Dienste auch im Falle eines Hardwareausfalls oder anderer Störungen weiter verfügbar bleiben.
Strategien für eine robuste Netzwerkverfügbarkeit
Georedundanz: Durch die Verteilung Ihrer Server auf mehrere geografische Standorte können Sie das Risiko eines vollständigen Systemausfalls minimieren. Diese Strategie erhöht die Ausfallsicherheit und reduziert die Latenz für internationale Benutzer.
Failover-Mechanismen: Die Implementierung von automatisierten Failover-Mechanismen stellt sicher, dass bei einem Ausfall eines Servers sofort ein Backup-Server aktiviert wird, um die Dienstverfügbarkeit aufrechtzuerhalten.
Load Balancer mit Redundanz: Der Einsatz redundanter Load Balancer sorgt für eine gleichmäßige Lastverteilung und verbessert die Ausfallsicherheit, indem sie verhindern, dass ein einzelner Ausfall den gesamten Datenverkehr beeinträchtigt.
Durch die weitere Vertiefung dieser Aspekte und die Implementierung der genannten Maßnahmen können Sie die Effizienz, Sicherheit und Zuverlässigkeit Ihrer OwnCloud-Umgebung auf dedizierten Root-Servern erheblich verbessern.
Networking is a complex topic, and there is lots of confusion around the definition of an “online” system. Sometimes the boot process gets delayed up to two minutes, because the system still waits for one or more network interfaces to be ready. Systemd provides the network-online.target that other service units can rely on, if they are deemed to require network connectivity. But what does “online” actually mean in this context, is a link-local IP address enough, do we need a routable gateway and how about DNS name resolution?
The requirements for an “online” network interface depend very much on the services using an interface. For some services it might be good enough to reach their local network segment (e.g. to announce Zeroconf services), while others need to reach domain names (e.g. to mount a NFS share) or reach the global internet to run a web server. On the other hand, the implementation of network-online.target varies, depending on which networking daemon is in use, e.g. systemd-networkd-wait-online.service or NetworkManager-wait-online.service. For Ubuntu, we created a specification that describes what we as a distro expect an “online” system to be. Having a definition in place, we are able to tackle the network-online-ordering issues that got reported over the years and can work out solutions to avoid delayed boot times on Ubuntu systems.
In essence, we want systems to reach the following networking state to be considered online:
Do not wait for “optional” interfaces to receive network configuration
Have IPv6 and/or IPv4 “link-local” addresses on every network interface
Have at least one interface with a globally routable connection
Have functional domain name resolution on any routable interface
A common implementation
NetworkManager and systemd-networkd are two very common networking daemons used on modern Linux systems. But they originate from different contexts and therefore show different behaviours in certain scenarios, such as wait-online. Luckily, on Ubuntu we already have Netplan as a unification layer on top of those networking daemons, that allows for common network configuration, and can also be used to tweak the wait-online logic.
With the recent release of Netplan v1.1 we introduced initial functionality to tweak the behaviour of the systemd-networkd-wait-online.service, as used on Ubuntu Server systems. When Netplan is used to drive the systemd-networkd backend, it will emit an override configuration file in /run/systemd/system/systemd-networkd-wait-online.service.d/10-netplan.conf, listing the specific non-optional interfaces that should receive link-local IP configuration. In parallel to that, it defines a list of network interfaces that Netplan detected to be potential global connections, and waits for any of those interfaces to reach a globally routable state.
In addition to the new features implemented in Netplan, we reached out to upstream systemd, proposing an enhancement to the systemd-networkd-wait-online service, integrating it with systemd-resolved to check for the availability of DNS name resolution. Once this is implemented upstream, we’re able to fully control the systemd-networkd backend on Ubuntu Server systems, to behave consistently and according to the definition of an “online” system that was lined out above.
Future work
The story doesn’t end there, because Ubuntu Desktop systems are using NetworkManager as their networking backend. This daemon provides its very own nm-online utility, utilized by the NetworkManager-wait-online systemd service. It implements a much higher-level approach, looking at the networking daemon in general instead of the individual network interfaces. By default, it considers a system to be online once every “autoconnect” profile got activated (or failed to activate), meaning that either a IPv4 or IPv6 address got assigned.
There are considerable enhancements to be implemented to this tool, for it to be controllable in a fine-granular way similar to systemd-networkd-wait-online, so that it can be instructed to wait for specific networking states on selected interfaces.
A note of caution
Making a service depend on network-online.target is considered an antipattern in most cases. This is because networking on Linux systems is very dynamic and the systemd target can only ever reflect the networking state at a single point in time. It cannot guarantee this state to be remained over the uptime of your system and has the potentially to delay the boot process considerably. Cables can be unplugged, wireless connectivity can drop, or remote routers can go down at any time, affecting the connectivity state of your local system. Therefore, “instead of wondering what to do about network.target, please just fix your program to be friendly to dynamically changing network configuration.” [source].
I’m happy to announce that Netplan version 1.1 is now available on GitHub and is soon to be deployed into a Debian and/or Ubuntu installation near you! Six months and 120 commits after the previous version (including one patch release v1.0.1), this release is brought to you by 17 free software contributors from around the globe. 🚀
Kudos to everybody involved! ❤️
Highlights
Custom systemd-networkd-wait-online logic override to wait for link-local and routable interfaces. (#456, #482)
Modification of the embedded-switch-mode setting without virtual-function (VF) definitions on SR-IOV devices (#454)
Parser flag to ignore individual, broken configurations, instead of not generating any backend configuration (#412)
With the work that has been done in the debian-installer/netcfg merge-proposal !9 it is possible to install a standard Debian system, using the normal Debian-Installer (d-i) mini.iso images, that will come pre-installed with Netplan and all network configuration structured in /etc/netplan/.
In this write-up, I’d like to run you through a list of commands for experiencing the Netplan enabled installation process first-hand. Let’s start with preparing a working directory and installing the software dependencies for our virtualized Debian system:
Next we’ll prepare a VM, by copying the EFI firmware files, preparing some persistent EFIVARs file, to boot from FS0:\EFI\debian\grubx64.efi, and create a virtual disk for our machine:
Finally, let’s launch the debian-installer using a preseed.cfg file, that will automatically install Netplan (netplan-generator) for us in the target system. A minimal preseed file could look like this:
For this demo, we’re installing the full netplan.io package (incl. the interactive Python CLI), as well as the netplan-generator package and systemd-resolved, to show the full Netplan experience. You can choose the preseed file from a set of different variants to test the different configurations:
We’re using the linux kernel and initrd.gz here to be able to pass the preseed URL as a parameter to the kernel’s cmdline directly. Launching this VM should bring up the official debian-installer in its netboot/gtk form:
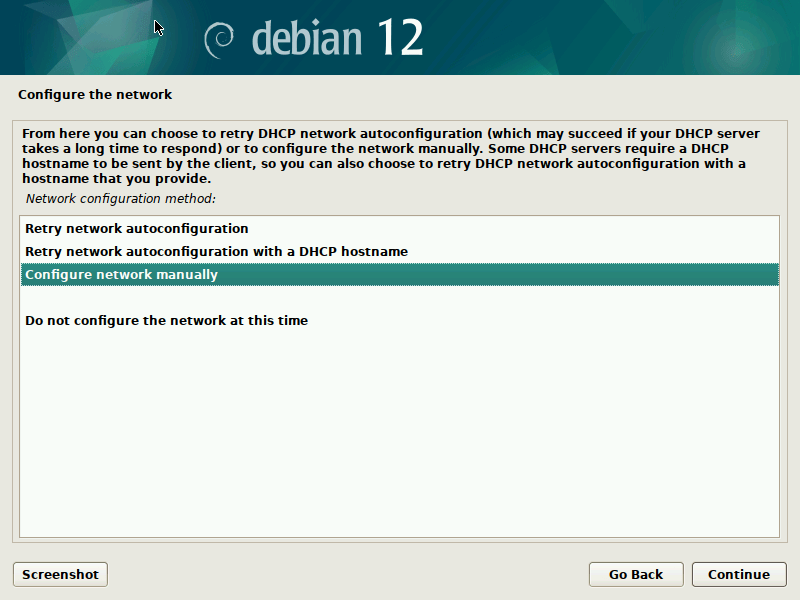
Now you can click through the normal Debian-Installer process, using mostly default settings. Optionally, you could play around with the networking settings, to see how those get translated to /etc/netplan/ in the target system.
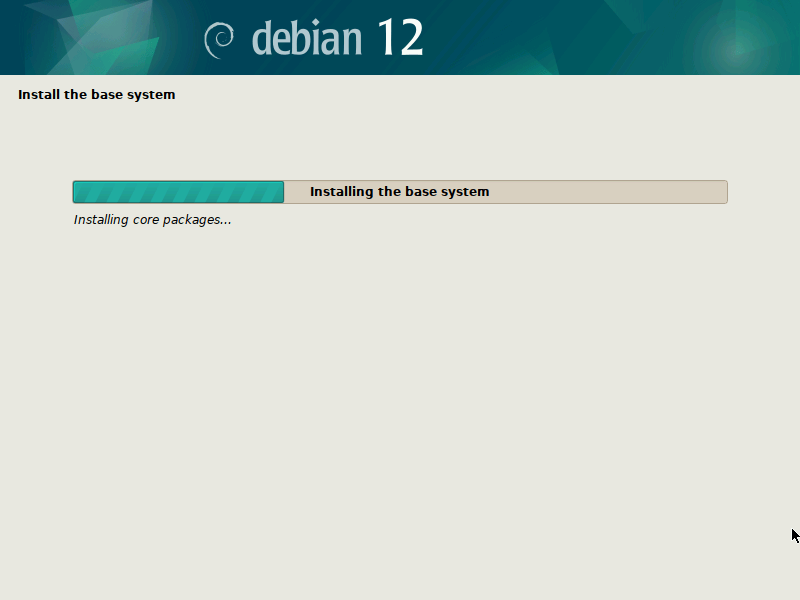
After you confirmed your partitioning changes, the base system gets installed. I suggest not to select any additional components, like desktop environments, to speed up the process.
During the final step of the installation (finish-install.d/55netcfg-copy-config) d-i will detect that Netplan was installed in the target system (due to the preseed file provided) and opt to write its network configuration to /etc/netplan/ instead of /etc/network/interfaces or /etc/NetworkManager/system-connections/.
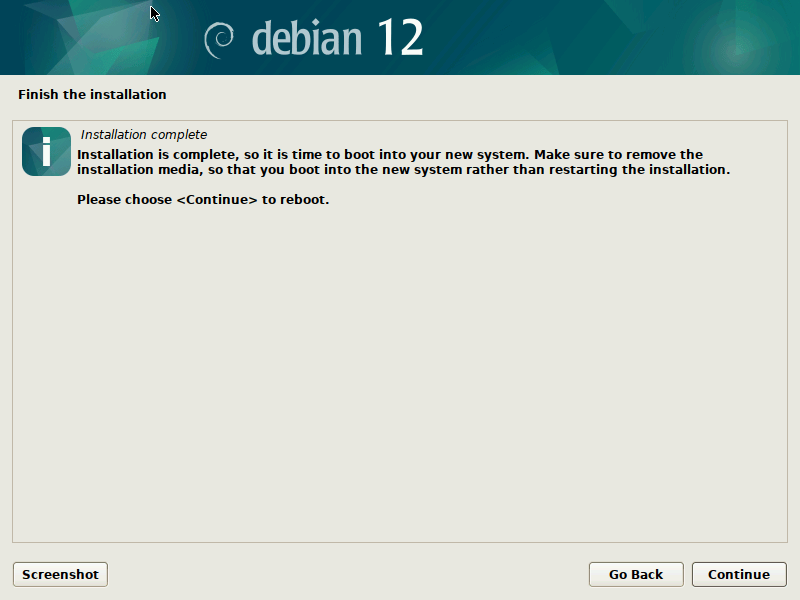
Done! After the installation finished, you can reboot into your virgin Debian Sid/Trixie system.
To do that, quit the current Qemu process, by pressing Ctrl+C and make sure to copy over the EFIVARS.fd file that was modified by grub during the installation, so Qemu can find the new system. Then reboot into the new system, not using the mini.iso image any more:
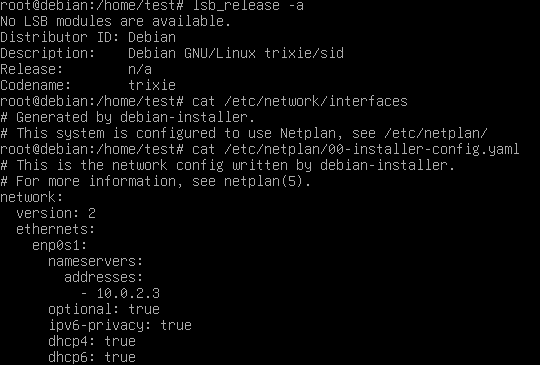
Finally, you can play around with your Netplan enabled Debian system! As you will find, /etc/network/interfaces exists but is empty, it could still be used (optionally/additionally). Netplan was configured in /etc/netplan/ according to the settings given during the d-i installation process.
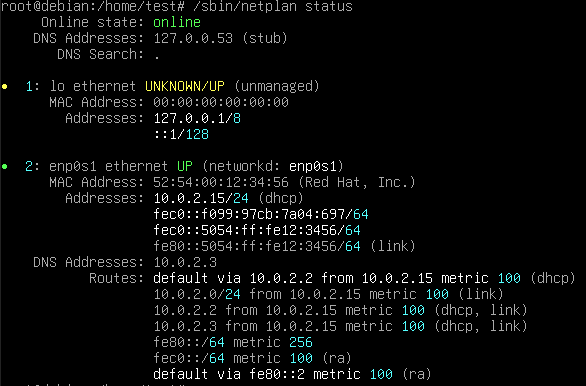
In our case, we also installed the Netplan CLI, so we can play around with some of its features, like netplan status:
Thank you for following along the Netplan enabled Debian installation process and happy hacking! If you want to learn more, find us at GitHub:netplan.
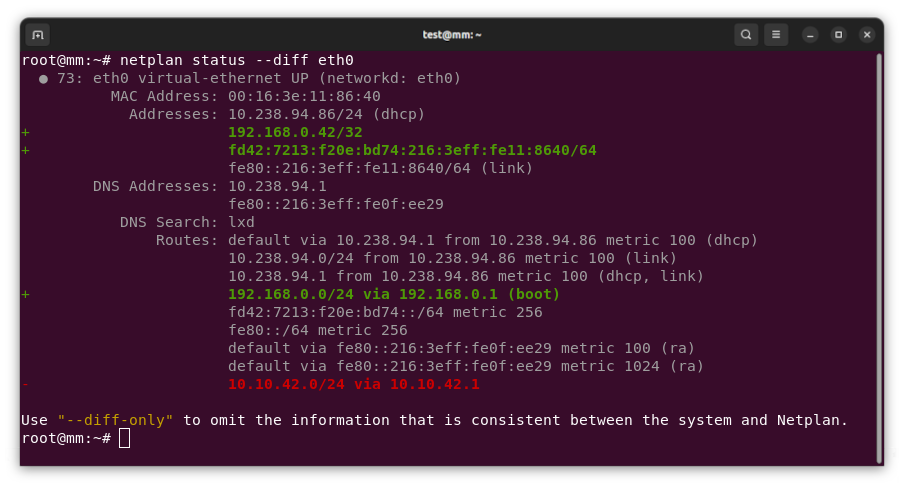
New “netplan status –diff” subcommand, finding differences between configuration and system state
As the maintainer and lead developer for Netplan, I’m proud to announce the general availability of Netplan v1.0 after more than 7 years of development efforts. Over the years, we’ve so far had about 80 individual contributors from around the globe. This includes many contributions from our Netplan core-team at Canonical, but also from other big corporations such as Microsoft or Deutsche Telekom. Those contributions, along with the many we receive from our community of individual contributors, solidify Netplan as a healthy and trusted open source project. In an effort to make Netplan even more dependable, we started shipping upstream patch releases, such as 0.106.1 and 0.107.1, which make it easier to integrate fixes into our users’ custom workflows.
With the release of version 1.0 we primarily focused on stability. However, being a major version upgrade, it allowed us to drop some long-standing legacy code from the libnetplan1 library. Removing this technical debt increases the maintainability of Netplan’s codebase going forward. The upcoming Ubuntu 24.04 LTS and Debian 13 releases will ship Netplan v1.0 to millions of users worldwide.
Highlights of version 1.0
In addition to stability and maintainability improvements, it’s worth looking at some of the new features that were included in the latest release:
Simultaneous WPA2 & WPA3 support.
Introduction of a stable libnetplan1 API.
Mellanox VF-LAG support for high performance SR-IOV networking.
New hairpin and port-mac-learning settings, useful for VXLAN tunnels with FRRouting.
New netplan status –diff subcommand, finding differences between configuration and system state.
Besides those highlights of the v1.0 release, I’d also like to shed some light on new functionality that was integrated within the past two years for those upgrading from the previous Ubuntu 22.04 LTS which used Netplan v0.104:
We added support for the management of new network interface types, such as veth, dummy, VXLAN, VRF or InfiniBand (IPoIB).
Wireless functionality was improved by integrating Netplan with NetworkManager on desktop systems, adding support for WPA3 and adding the notion of a regulatory-domain, to choose proper frequencies for specific regions.
To improve maintainability, we moved to Meson as Netplan’s buildsystem, added upstream CI coverage for multiple Linux distributions and integrations (such as Debian testing, NetworkManager, snapd or cloud-init), checks for ABI compatibility, and automatic memory leak detection.
We increased consistency between the supported backend renderers (systemd-networkd and NetworkManager), by matching physical network interfaces on permanent MAC address, when the match.macaddress setting is being used, and added new hardware offloading functionality for high performance networking, such as Single-Root IO Virtualisation virtual function link-aggregation (SR-IOV VF-LAG).
The much improved Netplan documentation, that is now hosted on “Read the Docs”, and new command line subcommands, such as netplan status, make Netplan a well vested tool for declarative network management and troubleshooting.
Integrations
Those changes pave the way to integrate Netplan in 3rd party projects, such as system installers or cloud deployment methods. By shipping the new python3-netplan Python bindings to libnetplan, it is now easier than ever to access Netplan functionality and network validation from other projects. We are proud that the Debian Cloud Team chose Netplan to be the default network management tool in their official cloud-images for Debian Bookworm and beyond. Ubuntu’s NetworkManager package now uses Netplan as it’s default backend on Ubuntu 23.10 Desktop systems and beyond. Further integrations happened with cloud-init and the Calamares installer.