Creating a Netplan enabled system through Debian-Installer

With the work that has been done in the debian-installer/netcfg merge-proposal !9 it is possible to install a standard Debian system, using the normal Debian-Installer (d-i) mini.iso images, that will come pre-installed with Netplan and all network configuration structured in /etc/netplan/.

In this write-up, I’d like to run you through a list of commands for experiencing the Netplan enabled installation process first-hand. For now, we’ll be using a custom ISO image, while waiting for the above-mentioned merge-proposal to be landed. Furthermore, as the Debian archive is going through major transitions builds of the “unstable” branch of d-i don’t currently work. So I implemented a small backport, producing updated netcfg and netcfg-static for Bookworm, which can be used as localudebs/ during the d-i build.

Let’s start with preparing a working directory and installing the software dependencies for our virtualized Debian system:

$ mkdir d-i_bookworm && cd d-i_bookworm
$ apt install ovmf qemu-utils qemu-system-x86

Now let’s download the custom mini.iso, linux kernel image and initrd.gz containing the Netplan enablement changes, as mentioned above.

$ wget https://people.ubuntu.com/~slyon/d-i/bookworm/mini.iso
$ wget https://people.ubuntu.com/~slyon/d-i/bookworm/linux
$ wget https://people.ubuntu.com/~slyon/d-i/bookworm/initrd.gz

Next we’ll prepare a VM, by copying the EFI firmware files, preparing some persistent EFIVARs file, to boot from FS0:\EFI\debian\grubx64.efi, and create a virtual disk for our machine:

$ cp /usr/share/OVMF/OVMF_CODE_4M.fd .
$ cp /usr/share/OVMF/OVMF_VARS_4M.fd .
$ qemu-img create -f qcow2 ./data.qcow2 5G

Finally, let’s launch the installer using a custom preseed.cfg file, that will automatically install Netplan for us in the target system. A minimal preseed file could look like this:

# Install minimal Netplan generator binary
d-i preseed/late_command string in-target apt-get -y install netplan-generator

For this demo, we’re installing the full netplan.io package (incl. Python CLI), as the netplan-generator package was not yet split out as an independent binary in the Bookworm cycle. You can choose the preseed file from a set of different variants to test the different configurations:

We’re using the custom linux kernel and initrd.gz here to be able to pass the preseed URL as a parameter to the kernel’s cmdline directly. Launching this VM should bring up the normal debian-installer in its netboot/gtk form:

$ export U=https://people.ubuntu.com/~slyon/d-i/bookworm/netplan-preseed+networkd.cfg
$ qemu-system-x86_64 \
	-M q35 -enable-kvm -cpu host -smp 4 -m 2G \
	-drive if=pflash,format=raw,unit=0,file=OVMF_CODE_4M.fd,readonly=on \
	-drive if=pflash,format=raw,unit=1,file=OVMF_VARS_4M.fd,readonly=off \
	-device qemu-xhci -device usb-kbd -device usb-mouse \
	-vga none -device virtio-gpu-pci \
	-net nic,model=virtio -net user \
	-kernel ./linux -initrd ./initrd.gz -append "url=$U" \
	-hda ./data.qcow2 -cdrom ./mini.iso;

Now you can click through the normal Debian-Installer process, using mostly default settings. Optionally, you could play around with the networking settings, to see how those get translated to /etc/netplan/ in the target system.

After you confirmed your partitioning changes, the base system gets installed. I suggest not to select any additional components, like desktop environments, to speed up the process.

During the final step of the installation (finish-install.d/55netcfg-copy-config) d-i will detect that Netplan was installed in the target system (due to the preseed file provided) and opt to write its network configuration to /etc/netplan/ instead of /etc/network/interfaces or /etc/NetworkManager/system-connections/.

Done! After the installation finished, you can reboot into your virgin Debian Bookworm system.

To do that, quit the current Qemu process, by pressing Ctrl+C and make sure to copy over the EFIVARS.fd file that was written by grub during the installation, so Qemu can find the new system. Then reboot into the new system, not using the mini.iso image any more:

$ cp ./OVMF_VARS_4M.fd ./EFIVARS.fd
$ qemu-system-x86_64 \
        -M q35 -enable-kvm -cpu host -smp 4 -m 2G \
        -drive if=pflash,format=raw,unit=0,file=OVMF_CODE_4M.fd,readonly=on \
        -drive if=pflash,format=raw,unit=1,file=EFIVARS.fd,readonly=off \
        -device qemu-xhci -device usb-kbd -device usb-mouse \
        -vga none -device virtio-gpu-pci \
        -net nic,model=virtio -net user \
        -drive file=./data.qcow2,if=none,format=qcow2,id=disk0 \
        -device virtio-blk-pci,drive=disk0,bootindex=1
        -serial mon:stdio

Finally, you can play around with your Netplan enabled Debian system! As you will find, /etc/network/interfaces exists but is empty, it could still be used (optionally/additionally). Netplan was configured in /etc/netplan/ according to the settings given during the d-i installation process.

In our case, we also installed the Netplan CLI, so we can play around with some of its features, like netplan status:

Thank you for following along the Netplan enabled Debian installation process and happy hacking! If you want to learn more, join the discussion at Salsa:installer-team/netcfg and find us at GitHub:netplan.

Netplan v1.0 paves the way to stable, declarative network management

New “netplan status –diff” subcommand, finding differences between configuration and system state

As the maintainer and lead developer for Netplan, I’m proud to announce the general availability of Netplan v1.0 after more than 7 years of development efforts. Over the years, we’ve so far had about 80 individual contributors from around the globe. This includes many contributions from our Netplan core-team at Canonical, but also from other big corporations such as Microsoft or Deutsche Telekom. Those contributions, along with the many we receive from our community of individual contributors, solidify Netplan as a healthy and trusted open source project. In an effort to make Netplan even more dependable, we started shipping upstream patch releases, such as 0.106.1 and 0.107.1, which make it easier to integrate fixes into our users’ custom workflows.

With the release of version 1.0 we primarily focused on stability. However, being a major version upgrade, it allowed us to drop some long-standing legacy code from the libnetplan1 library. Removing this technical debt increases the maintainability of Netplan’s codebase going forward. The upcoming Ubuntu 24.04 LTS and Debian 13 releases will ship Netplan v1.0 to millions of users worldwide.

Highlights of version 1.0

In addition to stability and maintainability improvements, it’s worth looking at some of the new features that were included in the latest release:

  • Simultaneous WPA2 & WPA3 support.
  • Introduction of a stable libnetplan1 API.
  • Mellanox VF-LAG support for high performance SR-IOV networking.
  • New hairpin and port-mac-learning settings, useful for VXLAN tunnels with FRRouting.
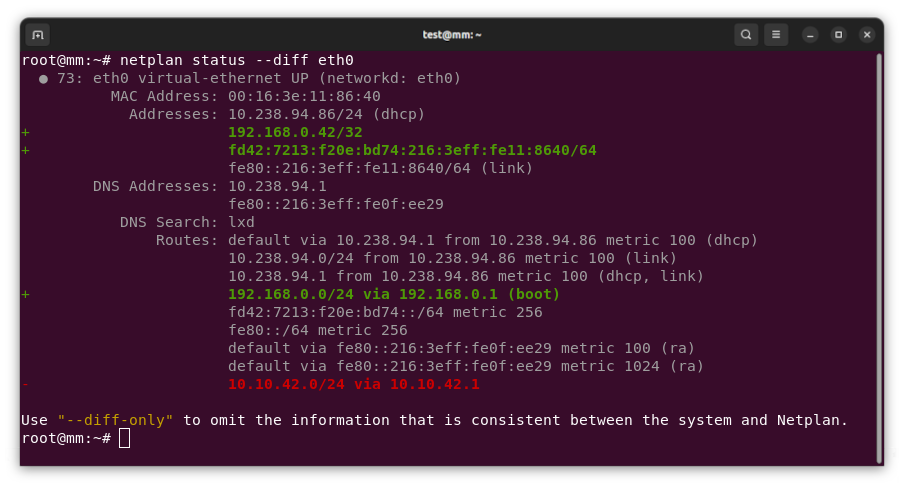
  • New netplan status –diff subcommand, finding differences between configuration and system state.

Besides those highlights of the v1.0 release, I’d also like to shed some light on new functionality that was integrated within the past two years for those upgrading from the previous Ubuntu 22.04 LTS which used Netplan v0.104:

  • We added support for the management of new network interface types, such as veth, dummy, VXLAN, VRF or InfiniBand (IPoIB). 
  • Wireless functionality was improved by integrating Netplan with NetworkManager on desktop systems, adding support for WPA3 and adding the notion of a regulatory-domain, to choose proper frequencies for specific regions. 
  • To improve maintainability, we moved to Meson as Netplan’s buildsystem, added upstream CI coverage for multiple Linux distributions and integrations (such as Debian testing, NetworkManager, snapd or cloud-init), checks for ABI compatibility, and automatic memory leak detection. 
  • We increased consistency between the supported backend renderers (systemd-networkd and NetworkManager), by matching physical network interfaces on permanent MAC address, when the match.macaddress setting is being used, and added new hardware offloading functionality for high performance networking, such as Single-Root IO Virtualisation virtual function link-aggregation (SR-IOV VF-LAG).

The much improved Netplan documentation, that is now hosted on “Read the Docs”, and new command line subcommands, such as netplan status, make Netplan a well vested tool for declarative network management and troubleshooting.

Integrations

Those changes pave the way to integrate Netplan in 3rd party projects, such as system installers or cloud deployment methods. By shipping the new python3-netplan Python bindings to libnetplan, it is now easier than ever to access Netplan functionality and network validation from other projects. We are proud that the Debian Cloud Team chose Netplan to be the default network management tool in their official cloud-images for Debian Bookworm and beyond. Ubuntu’s NetworkManager package now uses Netplan as it’s default backend on Ubuntu 23.10 Desktop systems and beyond. Further integrations happened with cloud-init and the Calamares installer.

Please check out the Netplan version 1.0 release on GitHub! If you want to learn more, follow our activities on Netplan.io, GitHub, Launchpad, IRC or our Netplan Developer Diaries blog on discourse.