A declarative approach to Linux networking with Netplan

Photo by Taylor Vick (Unsplash)

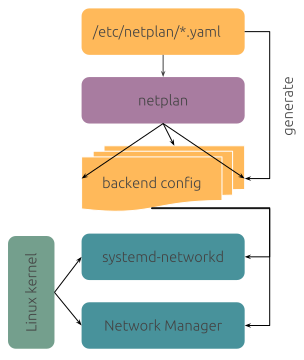
Linux networking can be confusing due to the wide range of technology stacks and tools in use, in addition to the complexity of the surrounding network environment. The configuration of bridges, bonds, VRFs or routes can be done programmatically, declaratively, manually or with automated with tools like ifupdown, ifupdown2, ifupdown-ng, iproute2, NetworkManager, systemd-networkd and others. Each  of these tools use different formats and locations to store their configuration files. Netplan, a utility for easily configuring networking on a Linux system, is designed to unify and standardise how administrators interact with these underlying technologies. Starting from a YAML description of the required network interfaces and what each should be configured to do, Netplan will generate all the necessary configuration for your chosen tool.

In this article, we will provide an overview of how Ubuntu uses Netplan to manage Linux networking in a unified way. By creating a common interface across two disparate technology stacks, IT administrators benefit from a unified experience across both desktops and servers whilst retaining the unique advantages of the underlying tech.

But first, let’s start with a bit of history and show where we are today.

The history of Netplan in Ubuntu

Starting with Ubuntu 16.10 and driven by the need to express network configuration in a common way across cloud metadata and other installer systems, we had the opportunity to switch to a network stack that integrates better with our dependency-based boot model. We chose systemd-networkd on server installations for its active upstream community and because it was already part of Systemd and therefore included in any Ubuntu base installation. It has a much better outlook for the future, using modern development techniques, good test coverage and CI integration, compared to the ifupdown tool we used previously. On desktop installations, we kept using NetworkManager due to its very good integration with the user interface.

Having to manage and configure two separate network stacks, depending on the Ubuntu variant in use, can be confusing, and we wanted to provide a streamlined user experience across any flavour of Ubuntu. Therefore, we introduced Netplan.io as a control layer above systemd-networkd and NetworkManager. Netplan takes declarative YAML files from /etc/netplan/ as an input and generates corresponding network configuration for the relevant network stack backend in /run/systemd/network/ or /run/NetworkManager/ depending on the system configuration. All while keeping full flexibility to control the underlying network stack in its native way if need be.

Design overview (netplan.io)

Who is using Netplan?

Recent versions of Netplan are available and ready to be installed on many distributions, such as Ubuntu, Fedora, RedHat Enterprise Linux, Debian and Arch Linux.

Ubuntu

As stated above, Netplan has been installed by default on Ubuntu systems since 2016 and is therefore being used by millions of users across multiple long-term support versions of Ubuntu (18.04, 20.04, 22.04) on a day-to-day basis. This covers Ubuntu server scenarios primarily, such as bridges, bonding, VLANs, VXLANs, VRFs, IP tunnels or WireGuard tunnels, using systemd-networkd as the backend renderer.

On Ubuntu desktop systems, Netplan can be used manually through its declarative YAML configuration files, and it will handle those to configure the NetworkManager stack. Keep reading to get a glimpse of how this will be improved through automation and integration with the desktop stack in the future.

Cloud

It might not be as obvious, but many people have been using Netplan without knowing about it when configuring a public cloud instance on AWS, Google Cloud or elsewhere through cloud-init. This is because cloud-init’s “Networking Config Version 2” is a passthrough configuration to Netplan, which will then set up the underlying network stack on the given cloud instance. This is why Netplan is also a key package on the Debian distribution, for example, as it’s being used by default on Debian cloud images, too.

Our vision for Linux networking

We know that Linux networking can be a beast, and we want to keep simple things simple. But also allow for custom setups of any complexity. With Netplan, the day-to-day networking needs are covered through easily comprehensible and nicely documented YAML files, that describe the desired state of the local network interfaces, which will be rendered into corresponding configuration files for the relevant network stack and applied at (re-)boot or at runtime, using the “netplan apply” CLI. For example /etc/netplan/lan.yaml:

network:
  version: 2
  renderer: networkd
  ethernets:
    enp3s0:
      dhcp4: true

Having a single source of truth for network configuration is also important for administrators, so they do not need to understand multiple network stacks, but can rely on the declarative data given in /etc/netplan/ to configure a system, independent of the underlying network configuration backend. This is also very helpful to seed the initial network configuration for new Linux installations, for example through installation systems such as Subiquity, Ubuntu’s desktop installer or cloud-init across the public and private clouds.

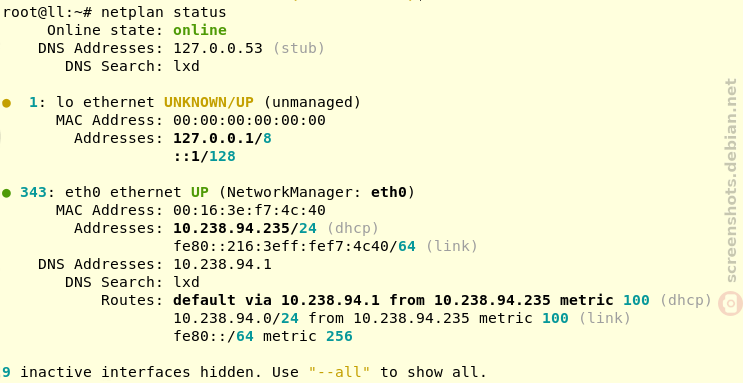
In addition to describing and applying network configuration, the “netplan status” CLI can be used to query relevant data from the underlying network stack(s), such as systemd-networkd, NetworkManager or iproute2, and present them in a unified way.

Netplan status (Debian)

At the Netplan project we strive for very high test automation and coverage with plenty of unit tests, integration tests and linting steps, across multiple Linux distros, which gives high confidence in also supporting more advanced networking use cases, such as Open vSwitch or SR-IOV network virtualization, in addition to normal wired (static IP, DHCP, routing), wireless (e.g. wwan modems, WPA2/3 connections, WiFi hotspot, controlling the regulatory domain, …) and common server scenarios.

Should there ever be a scenario that is not covered by Netplan natively, it allows for full flexibility to control the underlying network stack directly through systemd override configurations or NetworkManager passthrough settings in addition to having manual configuration side-by-side with interfaces controlled through Netplan.

The future of Netplan desktop integration

On workstations, the most common scenario is for end users to configure NetworkManager through its user interface tools, instead of driving it through Netplan’s declarative YAML files, which makes use of NetworkManager’s native configuration files. To avoid Netplan just handing over control to NetworkManager on such systems, we’re working on a bidirectional integration between NetworkManager and Netplan to further improve the “single source of truth” use case on Ubuntu desktop installations.

Netplan is shipping a “libnetplan” library that provides an API to access Netplan’s parser and validation internals, that can be used by NetworkManager to write back a network interface configuration. For instance, configuration given through NetworkManager’s UI tools or D-Bus API can be exported to Netplan’s native YAML format in the common location at /etc/netplan/. This way, administrators just need to care about Netplan when managing a fleet of Desktop installations. This solution is currently being used in more confined environments, like Ubuntu Core, when using the NetworkManager snap, and we will deliver it to generic Ubuntu desktop systems in 24.04 LTS.

In addition to NetworkManager, libnetplan can also be used to integrate with other tools in the networking space, such as cloud-init for improved validation of user data or installation systems when seeding new Linux images.

Conclusion

Overall, Netplan can be considered to be a good citizen within a network environment that plays hand-in-hand with other networking tools and makes it easy to control modern network stacks, such as systemd-networkd or NetworkManager in a common, streamlined and declarative way. It provides a “single source of truth” to network administrators about the network state, while keeping simple things simple, but allowing for arbitrarily complex custom setups.
If you want to learn more, feel free to follow our activities on Netplan.io, GitHub, Launchpad, IRC or our Netplan Developer Diaries blog on discourse.

Karrierepfade im Bereich IT-Testing: Welche Möglichkeiten stehen Ihnen offen?

Karrierepfade im Bereich IT-Testing bieten Ihnen zahlreiche Möglichkeiten, um in der sich ständig weiterentwickelnden Welt der Software- und Hardware-Technologie Fuß zu fassen. Als jemand, der an diesen Bereichen interessiert ist, fragen Sie sich vielleicht, welche Karrieremöglichkeiten Ihnen offenstehen und wie Sie Ihre Fähigkeiten und Interessen am besten nutzen können.

Ein vielversprechender Karriereweg im IT-Testing ist die Rolle des Software-Testers. Hier haben Sie die Chance, sowohl manuelles Testing als auch Testautomatisierung und Qualitätssicherung zu beherrschen. Durch die Kombination von technischem Fachwissen und analytischen Fähigkeiten tragen Sie dazu bei, die Funktionalität und Zuverlässigkeit von Softwarelösungen sicherzustellen.

Für diejenigen, die gerne in leitenden Positionen arbeiten, bietet der Karrierepfad des Testmanagers spannende Möglichkeiten. Als Testmanager koordinieren Sie das Testing-Team, entwickeln Teststrategien und optimieren den gesamten Testprozess. Hier geht es darum, ein tiefes Verständnis für das Projektmanagement und die Anforderungen an die Qualitätssicherung zu entwickeln.

Darüber hinaus eröffnen sich im IT-Testing auch verschiedene Spezialisierungsmöglichkeiten. Dazu gehören beispielsweise Performance-Testing, Sicherheitstests und andere Bereiche, in denen spezifisches Wissen und Fachkenntnisse gefragt sind.

Software-Tester: Von manuellem Testing zu Testautomatisierung und Qualitätssicherung

Als Software-Tester stehen Ihnen spannende Karrierepfade offen, die von manuellem Testing über Testautomatisierung bis hin zur Qualitätssicherung reichen. Diese verschiedenen Bereiche ermöglichen es Ihnen, Ihre Fähigkeiten und Expertise weiterzuentwickeln und eine wertvolle Rolle in der Softwareentwicklung zu spielen.

Beim manuellen Testing überprüfen Sie Software manuell auf Funktionalität, Benutzerfreundlichkeit und Fehler. Sie testen die Anwendungen auf verschiedenen Plattformen und stellen sicher, dass sie den Anforderungen und Spezifikationen entsprechen. Dabei kommen Ihre analytischen Fähigkeiten und Ihre Detailgenauigkeit zum Einsatz.

Mit der zunehmenden Automatisierung in der Softwareentwicklung gewinnt auch die Testautomatisierung an Bedeutung. Hier nutzen Sie spezielle Tools und Skripte, um wiederholbare Testfälle zu automatisieren und so den Testprozess effizienter zu gestalten. Das ermöglicht Ihnen, sich auf anspruchsvollere Testaufgaben zu konzentrieren und die Testabdeckung zu verbessern.

Als Software-Tester haben Sie auch die Möglichkeit, sich auf Qualitätssicherung zu spezialisieren. In diesem Bereich entwickeln Sie Teststrategien und -prozesse, um sicherzustellen, dass die Software den höchsten Qualitätsstandards entspricht. Sie überwachen die Testergebnisse, analysieren Defekte und arbeiten eng mit Entwicklern zusammen, um Qualitätsprobleme zu identifizieren und zu beheben.

Testmanager: Das Team koordinieren, Strategien entwickeln und den Testprozess optimieren

Als Testmanager haben Sie die Möglichkeit, das Testing-Team zu koordinieren, Teststrategien zu entwickeln und den gesamten Testprozess zu optimieren. Diese verantwortungsvolle Rolle ermöglicht es Ihnen, eine Schlüsselposition einzunehmen und einen wesentlichen Beitrag zur Qualitätssicherung in der Softwareentwicklung zu leisten.

Ihre Aufgaben als Testmanager umfassen:

  1. Teamkoordination: Sie sind verantwortlich für die Zuweisung von Aufgaben, die Überwachung des Fortschritts und die Gewährleistung einer effizienten Zusammenarbeit im Team. Durch klare Kommunikation und Führungskompetenz fördern Sie eine produktive Arbeitsumgebung.
  2. Strategieentwicklung: Sie entwickeln Teststrategien und -pläne, um sicherzustellen, dass alle relevanten Aspekte der Software getestet werden. Dabei berücksichtigen Sie die Anforderungen, Risiken und Zielsetzungen des Projekts.
  3. Testprozessoptimierung: Sie evaluieren kontinuierlich den Testprozess, identifizieren Engpässe und Schwachstellen und treffen Maßnahmen zur Optimierung. Dies umfasst die Automatisierung von Testabläufen, die Implementierung von effektiven Testmethoden und die Einführung von Qualitätsstandards.
  4. Stakeholder-Management: Sie kommunizieren mit verschiedenen Stakeholdern, einschließlich Entwicklern, Projektmanagern und Kunden, um die Anforderungen zu verstehen und sicherzustellen, dass die Testaktivitäten den Erwartungen entsprechen.

In der Rolle des Testmanagers tragen Sie maßgeblich zur Sicherstellung der Qualität von Softwarelösungen bei. Sie haben die Möglichkeit, das Team zu führen, strategische Entscheidungen zu treffen und den Testprozess zu optimieren, um hochwertige Produkte zu liefern.

Spezialisierungsoptionen im IT-Testing: Performance-Testing, Sicherheitstests und mehr

Als IT-Tester haben Sie eine Vielzahl von Spezialisierungsoptionen, die Ihnen ermöglichen, sich auf bestimmte Bereiche des Testens zu konzentrieren. Eine solche Spezialisierung eröffnet Ihnen neue Karrieremöglichkeiten und erweitert Ihre Fachkenntnisse im IT Tester Job.

Eine wichtige Spezialisierungsmöglichkeit ist das Performance-Testing. Hier liegt der Fokus darauf, die Leistungsfähigkeit einer Softwarelösung unter verschiedenen Belastungsbedingungen zu testen. Sie identifizieren Engpässe, ermitteln die Skalierbarkeit und Leistungsgrenzen und optimieren die Performance, um sicherzustellen, dass die Software den Anforderungen gerecht wird.

Ein weiterer Bereich der Spezialisierung sind Sicherheitstests. Hier liegt der Fokus auf der Identifizierung von Sicherheitslücken, Schwachstellen und Risiken in einer Software. Sie führen Penetrationstests durch, analysieren Sicherheitsarchitekturen und entwickeln Strategien zum Schutz vor potenziellen Bedrohungen.

Weitere Spezialisierungsoptionen im IT-Testing umfassen:

  • Usability-Testing: Hier liegt der Schwerpunkt auf der Benutzerfreundlichkeit und dem Benutzererlebnis einer Softwarelösung.
  • Mobile-App-Testing: Sie spezialisieren sich auf das Testen von mobilen Anwendungen und stellen sicher, dass diese auf verschiedenen Geräten und Plattformen reibungslos funktionieren.
  • Automatisiertes Regressionstesting: Sie entwickeln automatisierte Testskripte, um Regressionstests effizient durchzuführen und die Stabilität der Softwarelösung zu gewährleisten.

Durch eine Spezialisierung im IT-Testing können Sie sich in einem bestimmten Bereich weiterentwickeln und Ihre Expertise gezielt einsetzen. Dies eröffnet Ihnen neue Karrierechancen und ermöglicht es Ihnen, einen Mehrwert für Projekte zu schaffen.

Netplan and systemd-networkd on Debian Bookworm

Debian’s cloud-images are using systemd-networkd as their default network stack in Bookworm. A slim and feature rich networking daemon that comes included with Systemd itself. Debian’s cloud-images are deploying Netplan on top of this as an easy-to-use, declarative control layer.

If you want to experiment with systemd-networkd and Netplan on Debian, this can be done easily in QEMU using the official images. To start, you need to download the relevant .qcow2 Debian cloud-image from: https://cloud.debian.org/images/cloud/bookworm/latest/

$ wget https://cloud.debian.org/images/cloud/bookworm/latest/debian-12-generic-amd64.qcow2

Prepare a cloud image

Next, you need to prepare some configuration files for cloud-init and Netplan, to prepare a data-source (seed.img) for your local cloud-image.

$ cat > meta.yaml <<EOF
instance-id: debian01
local-hostname: cloudimg
EOF
$ cat > user.yaml <<EOF
#cloud-config
ssh_pwauth: true
password: test
chpasswd:
  expire: false
EOF
$ cat > netplan.yaml <<EOF
network:
  version: 2
  ethernets:
    id0:
      match:
        macaddress: "ca:fe:ca:fe:00:aa"
      dhcp4: true
      dhcp6: true
      set-name: lan0
EOF

Once all configuration is prepared, you can create the local data-source image, using the cloud-localds tool from the cloud-image-utils package:

$ cloud-localds --network-config=netplan.yaml seed.img user.yaml meta.yaml

Launch the local VM

Now, everything is prepared to launch a QEMU VM with two NICs and do some experimentation! The following command will launch an ephemeral environment for you, keeping the original Debian cloud-image untouched. If you want to preserve any changes on disk, you can remove the trailing -snapshot parameter.

$ qemu-system-x86_64 \
  -machine accel=kvm,type=q35 \
  -cpu host \
  -m 2G \
  -device virtio-net-pci,netdev=net0,mac=ca:fe:ca:fe:00:aa \
  -netdev user,id=net0,hostfwd=tcp::2222-:22 \
  -nic user,model=virtio-net-pci,mac=f0:0d:ca:fe:00:bb \
  -drive if=virtio,format=qcow2,file=debian-12-generic-amd64.qcow2 \
  -drive if=virtio,format=raw,file=seed.img -snapshot

We set up the default debian user account through cloud-init’s user-data configuration above, so you can now login to the system, using that user with the (very unsafe!) password “test”.

$ ssh -o "StrictHostKeyChecking=no" -o "UserKnownHostsFile=/dev/null" -p 2222 debian@localhost # password: test

Experience Netplan and systemd-networkd

Once logged in successfully, you can execute the netplan status command to check the system’s network configuration, as configured through cloud-init’s netplan.yaml passthrough. So you’ve already used Netplan at this point implicitly and it did all the configuration of systemd-networkd for you in the background!

debian@cloudimg:~$ sudo netplan status -a
     Online state: online
    DNS Addresses: 10.0.2.3 (compat)
       DNS Search: .

●  1: lo ethernet UNKNOWN/UP (unmanaged)
      MAC Address: 00:00:00:00:00:00
        Addresses: 127.0.0.1/8
                   ::1/128
           Routes: ::1 metric 256

●  2: enp0s2 ethernet DOWN (unmanaged)
      MAC Address: f0:0d:ca:fe:00:bb (Red Hat, Inc.)

●  3: lan0 ethernet UP (networkd: id0)
      MAC Address: ca:fe:ca:fe:00:aa (Red Hat, Inc.)
        Addresses: 10.0.2.15/24 (dhcp)
                   fec0::c8fe:caff:fefe:aa/64
                   fe80::c8fe:caff:fefe:aa/64 (link)
    DNS Addresses: 10.0.2.3
           Routes: default via 10.0.2.2 from 10.0.2.15 metric 100 (dhcp)
                   10.0.2.0/24 from 10.0.2.15 metric 100 (link)
                   10.0.2.2 from 10.0.2.15 metric 100 (dhcp, link)
                   10.0.2.3 from 10.0.2.15 metric 100 (dhcp, link)
                   fe80::/64 metric 256
                   fec0::/64 metric 100 (ra)
                   default via fe80::2 metric 100 (ra)

As you can see from this output, the lan0 interface is configured via the “id0” Netplan ID to be managed by systemd-networkd. Compare this data to the netplan.yaml file above, the networkctl output, the local Netplan configuration in /etc/netplan/ and the auto-generated systemd-networkd configuration.

debian@cloudimg:~$ networkctl 
IDX LINK   TYPE     OPERATIONAL SETUP     
  1 lo     loopback carrier     unmanaged
  2 enp0s2 ether    off         unmanaged
  3 lan0   ether    routable    configured

3 links listed.

debian@cloudimg:~$ cat /etc/netplan/50-cloud-init.yaml 
# [...]
network:
    ethernets:
        id0:
            dhcp4: true
            dhcp6: true
            match:
                macaddress: ca:fe:ca:fe:00:aa
            set-name: lan0
    version: 2

debian@cloudimg:~$ ls -l /run/systemd/network/
total 8
-rw-r--r-- 1 root root  78 Jul  5 15:23 10-netplan-id0.link
-rw-r--r-- 1 root root 137 Jul  5 15:23 10-netplan-id0.network

Now you can go ahead and try something more advanced, like link aggregation, using the second NIC that you configured for this QEMU VM and explore all the possibilities of Netplan on Debian, by checking the Netplan YAML documentation.