Waiting for a Linux system to be online

Designed by Freepik

What is an “online” system?

Networking is a complex topic, and there is lots of confusion around the definition of an “online” system. Sometimes the boot process gets delayed up to two minutes, because the system still waits for one or more network interfaces to be ready. Systemd provides the network-online.target that other service units can rely on, if they are deemed to require network connectivity. But what does “online” actually mean in this context, is a link-local IP address enough, do we need a routable gateway and how about DNS name resolution?

The requirements for an “online” network interface depend very much on the services using an interface. For some services it might be good enough to reach their local network segment (e.g. to announce Zeroconf services), while others need to reach domain names (e.g. to mount a NFS share) or reach the global internet to run a web server. On the other hand, the implementation of network-online.target varies, depending on which networking daemon is in use, e.g. systemd-networkd-wait-online.service or NetworkManager-wait-online.service. For Ubuntu, we created a specification that describes what we as a distro expect an “online” system to be. Having a definition in place, we are able to tackle the network-online-ordering issues that got reported over the years and can work out solutions to avoid delayed boot times on Ubuntu systems.

In essence, we want systems to reach the following networking state to be considered online:

  1. Do not wait for “optional” interfaces to receive network configuration
  2. Have IPv6 and/or IPv4 “link-local” addresses on every network interface
  3. Have at least one interface with a globally routable connection
  4. Have functional domain name resolution on any routable interface

A common implementation

NetworkManager and systemd-networkd are two very common networking daemons used on modern Linux systems. But they originate from different contexts and therefore show different behaviours in certain scenarios, such as wait-online. Luckily, on Ubuntu we already have Netplan as a unification layer on top of those networking daemons, that allows for common network configuration, and can also be used to tweak the wait-online logic.

With the recent release of Netplan v1.1 we introduced initial functionality to tweak the behaviour of the systemd-networkd-wait-online.service, as used on Ubuntu Server systems. When Netplan is used to drive the systemd-networkd backend, it will emit an override configuration file in /run/systemd/system/systemd-networkd-wait-online.service.d/10-netplan.conf, listing the specific non-optional interfaces that should receive link-local IP configuration. In parallel to that, it defines a list of network interfaces that Netplan detected to be potential global connections, and waits for any of those interfaces to reach a globally routable state.

Such override config file might look like this:

[Unit]
ConditionPathIsSymbolicLink=/run/systemd/generator/network-online.target.wants/systemd-networkd-wait-online.service

[Service]
ExecStart=
ExecStart=/lib/systemd/systemd-networkd-wait-online -i eth99.43:carrier -i lo:carrier -i eth99.42:carrier -i eth99.44:degraded -i bond0:degraded
ExecStart=/lib/systemd/systemd-networkd-wait-online --any -o routable -i eth99.43 -i eth99.45 -i bond0

In addition to the new features implemented in Netplan, we reached out to upstream systemd, proposing an enhancement to the systemd-networkd-wait-online service, integrating it with systemd-resolved to check for the availability of DNS name resolution. Once this is implemented upstream, we’re able to fully control the systemd-networkd backend on Ubuntu Server systems, to behave consistently and according to the definition of an “online” system that was lined out above.

Future work

The story doesn’t end there, because Ubuntu Desktop systems are using NetworkManager as their networking backend. This daemon provides its very own nm-online utility, utilized by the NetworkManager-wait-online systemd service. It implements a much higher-level approach, looking at the networking daemon in general instead of the individual network interfaces. By default, it considers a system to be online once every “autoconnect” profile got activated (or failed to activate), meaning that either a IPv4 or IPv6 address got assigned.

There are considerable enhancements to be implemented to this tool, for it to be controllable in a fine-granular way similar to systemd-networkd-wait-online, so that it can be instructed to wait for specific networking states on selected interfaces.

A note of caution

Making a service depend on network-online.target is considered an antipattern in most cases. This is because networking on Linux systems is very dynamic and the systemd target can only ever reflect the networking state at a single point in time. It cannot guarantee this state to be remained over the uptime of your system and has the potentially to delay the boot process considerably. Cables can be unplugged, wireless connectivity can drop, or remote routers can go down at any time, affecting the connectivity state of your local system. Therefore, “instead of wondering what to do about network.target, please just fix your program to be friendly to dynamically changing network configuration.” [source].

Netplan v1.1 released

I’m happy to announce that Netplan version 1.1 is now available on GitHub and is soon to be deployed into a Debian and/or Ubuntu installation near you! Six months and 120 commits after the previous version (including one patch release v1.0.1), this release is brought to you by 17 free software contributors from around the globe. 🚀

Kudos to everybody involved! ❤️

Highlights

  • Custom systemd-networkd-wait-online logic override to wait for link-local and routable interfaces. (#456#482)
  • Modification of the embedded-switch-mode setting without virtual-function (VF) definitions on SR-IOV devices (#454)
  • Parser flag to ignore individual, broken configurations, instead of not generating any backend configuration (#412)
  • Fixes for @ProtonVPN (#495) and @microsoft Azure Linux (#445), contributed by those companies

Releasing v1.1

Documentation

Bug fixes

New Contributors

Full Changelog1.0…1.1

Creating a Netplan enabled system through Debian-Installer

With the work that has been done in the debian-installer/netcfg merge-proposal !9 it is possible to install a standard Debian system, using the normal Debian-Installer (d-i) mini.iso images, that will come pre-installed with Netplan and all network configuration structured in /etc/netplan/.

In this write-up, I’d like to run you through a list of commands for experiencing the Netplan enabled installation process first-hand. Let’s start with preparing a working directory and installing the software dependencies for our virtualized Debian system:

$ mkdir d-i_tmp && cd d-i_tmp
$ apt install ovmf qemu-utils qemu-system-x86

Now let’s download the official (daily) mini.iso, linux kernel image and initrd.gz containing the Netplan enablement changes:

$ wget https://d-i.debian.org/daily-images/amd64/daily/netboot/gtk/mini.iso
$ wget https://d-i.debian.org/daily-images/amd64/daily/netboot/gtk/debian-installer/amd64/initrd.gz
$ wget https://d-i.debian.org/daily-images/amd64/daily/netboot/gtk/debian-installer/amd64/linux

Next we’ll prepare a VM, by copying the EFI firmware files, preparing some persistent EFIVARs file, to boot from FS0:\EFI\debian\grubx64.efi, and create a virtual disk for our machine:

$ cp /usr/share/OVMF/OVMF_CODE_4M.fd .
$ cp /usr/share/OVMF/OVMF_VARS_4M.fd .
$ qemu-img create -f qcow2 ./data.qcow2 20G

Finally, let’s launch the debian-installer using a preseed.cfg file, that will automatically install Netplan (netplan-generator) for us in the target system. A minimal preseed file could look like this:

# Install minimal Netplan generator binary
d-i preseed/late_command string in-target apt-get -y install netplan-generator

For this demo, we’re installing the full netplan.io package (incl. the interactive Python CLI), as well as the netplan-generator package and systemd-resolved, to show the full Netplan experience. You can choose the preseed file from a set of different variants to test the different configurations:

We’re using the linux kernel and initrd.gz here to be able to pass the preseed URL as a parameter to the kernel’s cmdline directly. Launching this VM should bring up the official debian-installer in its netboot/gtk form:

$ export U=https://people.ubuntu.com/~slyon/d-i/netplan-preseed+full.cfg
$ qemu-system-x86_64 \
	-M q35 -enable-kvm -cpu host -smp 4 -m 2G \
	-drive if=pflash,format=raw,unit=0,file=OVMF_CODE_4M.fd,readonly=on \
	-drive if=pflash,format=raw,unit=1,file=OVMF_VARS_4M.fd,readonly=off \
	-device qemu-xhci -device usb-kbd -device usb-mouse \
	-vga none -device virtio-gpu-pci \
	-net nic,model=virtio -net user \
	-kernel ./linux -initrd ./initrd.gz -append "url=$U" \
	-hda ./data.qcow2 -cdrom ./mini.iso;

Now you can click through the normal Debian-Installer process, using mostly default settings. Optionally, you could play around with the networking settings, to see how those get translated to /etc/netplan/ in the target system.

After you confirmed your partitioning changes, the base system gets installed. I suggest not to select any additional components, like desktop environments, to speed up the process.

During the final step of the installation (finish-install.d/55netcfg-copy-config) d-i will detect that Netplan was installed in the target system (due to the preseed file provided) and opt to write its network configuration to /etc/netplan/ instead of /etc/network/interfaces or /etc/NetworkManager/system-connections/.

Done! After the installation finished, you can reboot into your virgin Debian Sid/Trixie system.

To do that, quit the current Qemu process, by pressing Ctrl+C and make sure to copy over the EFIVARS.fd file that was modified by grub during the installation, so Qemu can find the new system. Then reboot into the new system, not using the mini.iso image any more:

$ cp ./OVMF_VARS_4M.fd ./EFIVARS.fd
$ qemu-system-x86_64 \
        -M q35 -enable-kvm -cpu host -smp 4 -m 2G \
        -drive if=pflash,format=raw,unit=0,file=OVMF_CODE_4M.fd,readonly=on \
        -drive if=pflash,format=raw,unit=1,file=EFIVARS.fd,readonly=off \
        -device qemu-xhci -device usb-kbd -device usb-mouse \
        -vga none -device virtio-gpu-pci \
        -net nic,model=virtio -net user \
        -drive file=./data.qcow2,if=none,format=qcow2,id=disk0 \
        -device virtio-blk-pci,drive=disk0,bootindex=1
        -serial mon:stdio

Finally, you can play around with your Netplan enabled Debian system! As you will find, /etc/network/interfaces exists but is empty, it could still be used (optionally/additionally). Netplan was configured in /etc/netplan/ according to the settings given during the d-i installation process.

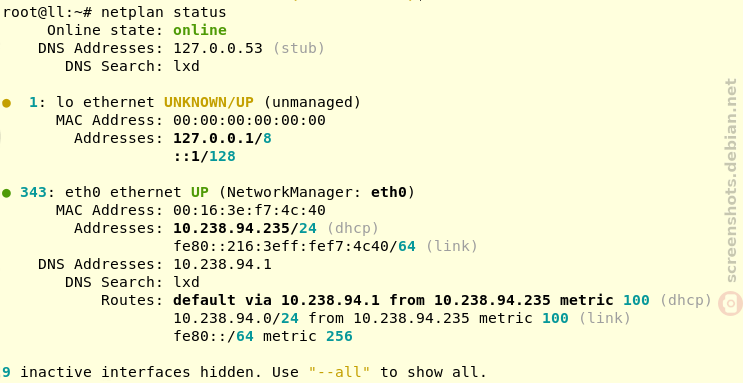
In our case, we also installed the Netplan CLI, so we can play around with some of its features, like netplan status:

Thank you for following along the Netplan enabled Debian installation process and happy hacking! If you want to learn more, find us at GitHub:netplan.

Netplan v1.0 paves the way to stable, declarative network management

New “netplan status –diff” subcommand, finding differences between configuration and system state

As the maintainer and lead developer for Netplan, I’m proud to announce the general availability of Netplan v1.0 after more than 7 years of development efforts. Over the years, we’ve so far had about 80 individual contributors from around the globe. This includes many contributions from our Netplan core-team at Canonical, but also from other big corporations such as Microsoft or Deutsche Telekom. Those contributions, along with the many we receive from our community of individual contributors, solidify Netplan as a healthy and trusted open source project. In an effort to make Netplan even more dependable, we started shipping upstream patch releases, such as 0.106.1 and 0.107.1, which make it easier to integrate fixes into our users’ custom workflows.

With the release of version 1.0 we primarily focused on stability. However, being a major version upgrade, it allowed us to drop some long-standing legacy code from the libnetplan1 library. Removing this technical debt increases the maintainability of Netplan’s codebase going forward. The upcoming Ubuntu 24.04 LTS and Debian 13 releases will ship Netplan v1.0 to millions of users worldwide.

Highlights of version 1.0

In addition to stability and maintainability improvements, it’s worth looking at some of the new features that were included in the latest release:

  • Simultaneous WPA2 & WPA3 support.
  • Introduction of a stable libnetplan1 API.
  • Mellanox VF-LAG support for high performance SR-IOV networking.
  • New hairpin and port-mac-learning settings, useful for VXLAN tunnels with FRRouting.
  • New netplan status –diff subcommand, finding differences between configuration and system state.

Besides those highlights of the v1.0 release, I’d also like to shed some light on new functionality that was integrated within the past two years for those upgrading from the previous Ubuntu 22.04 LTS which used Netplan v0.104:

  • We added support for the management of new network interface types, such as veth, dummy, VXLAN, VRF or InfiniBand (IPoIB). 
  • Wireless functionality was improved by integrating Netplan with NetworkManager on desktop systems, adding support for WPA3 and adding the notion of a regulatory-domain, to choose proper frequencies for specific regions. 
  • To improve maintainability, we moved to Meson as Netplan’s buildsystem, added upstream CI coverage for multiple Linux distributions and integrations (such as Debian testing, NetworkManager, snapd or cloud-init), checks for ABI compatibility, and automatic memory leak detection. 
  • We increased consistency between the supported backend renderers (systemd-networkd and NetworkManager), by matching physical network interfaces on permanent MAC address, when the match.macaddress setting is being used, and added new hardware offloading functionality for high performance networking, such as Single-Root IO Virtualisation virtual function link-aggregation (SR-IOV VF-LAG).

The much improved Netplan documentation, that is now hosted on “Read the Docs”, and new command line subcommands, such as netplan status, make Netplan a well vested tool for declarative network management and troubleshooting.

Integrations

Those changes pave the way to integrate Netplan in 3rd party projects, such as system installers or cloud deployment methods. By shipping the new python3-netplan Python bindings to libnetplan, it is now easier than ever to access Netplan functionality and network validation from other projects. We are proud that the Debian Cloud Team chose Netplan to be the default network management tool in their official cloud-images for Debian Bookworm and beyond. Ubuntu’s NetworkManager package now uses Netplan as it’s default backend on Ubuntu 23.10 Desktop systems and beyond. Further integrations happened with cloud-init and the Calamares installer.

Please check out the Netplan version 1.0 release on GitHub! If you want to learn more, follow our activities on Netplan.io, GitHub, Launchpad, IRC or our Netplan Developer Diaries blog on discourse.

Multi-Cloud-Hosting: Vorteile und Implementierungsstrategien

In der heutigen schnelllebigen digitalen Landschaft ist Multi-Cloud-Hosting nicht nur ein Buzzword, sondern eine wesentliche Komponente für Unternehmen, die nach Robustheit, Flexibilität und Skalierbarkeit in ihrer Online-Präsenz streben. Während traditionelles Webhosting auf einem einzelnen Server oder innerhalb eines einzigen Cloud-Anbieters beruht, ermöglicht Multi-Cloud-Hosting die Verteilung von Ressourcen über mehrere Cloud-Plattformen hinweg. Diese innovative Hosting-Lösung bietet eine einzigartige Kombination aus Vorteilen, darunter verbesserte Ausfallsicherheit, optimierte Leistung und erhöhte Flexibilität, die sie besonders attraktiv für Webhosting-Experten und technikaffine Unternehmen macht. Die Implementierung einer Multi-Cloud-Strategie kann jedoch komplexe Herausforderungen mit sich bringen, von der Datenmigration bis hin zur Sicherheit und Kostenkontrolle. Daher ist ein tiefgreifendes Verständnis sowohl der Vorteile als auch der Implementierungsstrategien von entscheidender Bedeutung, um die Potenziale von Multi-Cloud-Hosting vollständig ausschöpfen zu können.

1. Verständnis der Multi-Cloud-Umgebung: Grundlagen und Key-Player

Multi-Cloud-Hosting umfasst die Nutzung von Cloud-Diensten verschiedener Anbieter, um eine diversifizierte Hosting-Umgebung zu schaffen. Diese Strategie ermöglicht es Unternehmen, die Stärken einzelner Cloud-Provider zu nutzen, während sie gleichzeitig Abhängigkeiten reduzieren und die Ausfallsicherheit verbessern. Zu den Key-Playern in der Multi-Cloud-Umgebung gehören große Cloud-Plattformen wie Amazon Web Services, Microsoft Azure, Google Cloud Platform und IBM Cloud, die jeweils einzigartige Dienste und Preismodelle bieten. Durch das Verständnis der spezifischen Funktionen und Angebote jedes Anbieters können Unternehmen eine Multi-Cloud-Strategie entwickeln, die ihre spezifischen Bedürfnisse erfüllt. Wesentlich ist dabei die Bewertung von Faktoren wie Performance, Sicherheit, Compliance und Kosten, um eine ausgewogene und effektive Cloud-Lösung zu konzipieren.

2. Die Vorteile von Multi-Cloud-Hosting: Flexibilität, Skalierbarkeit und Risikominimierung

Der entscheidende Vorteil des Multi-Cloud-Hostings liegt in seiner unübertroffenen Flexibilität und Skalierbarkeit. Unternehmen können Ressourcen dynamisch zuweisen oder entziehen, um auf Nachfrageschwankungen zu reagieren, ohne an die Grenzen eines einzigen Anbieters gebunden zu sein. Diese Flexibilität ermöglicht eine optimale Performance und Effizienz, insbesondere bei der Handhabung von Spitzenlasten oder global verteilten Nutzern. Darüber hinaus trägt die Diversifizierung der Cloud-Dienste zur Risikominimierung bei, da die Abhängigkeit von einem einzigen Anbieter verringert wird, was die Resilienz gegenüber Ausfällen und anderen Störungen verbessert.

3. Strategien zur Implementierung von Multi-Cloud-Hosting: Best Practices für Experten

Die Implementierung von Multi-Cloud-Hosting erfordert sorgfältige Planung und Strategie. Zu den Best Practices gehören die Bewertung der eigenen Bedürfnisse und Ziele, die Auswahl kompatibler Cloud-Dienste und die Entwicklung eines kohärenten Datenmanagements und einer Governance-Struktur. Wichtig ist auch die Berücksichtigung von Aspekten wie Netzwerkdesign, Sicherheitsrichtlinien und Kostenmanagement. Durch die Entwicklung eines umfassenden Implementierungsplans, der Schulung von Personal und der Einrichtung effektiver Überwachungs- und Managementtools können Unternehmen die Vorteile des Multi-Cloud-Hostings maximieren und gleichzeitig potenzielle Fallstricke minimieren.

4. Herausforderungen und Lösungen im Multi-Cloud-Hosting: Sicherheit, Datenmanagement und Kostenkontrolle

Trotz seiner vielen Vorteile bringt Multi-Cloud-Hosting auch spezifische Herausforderungen mit sich, insbesondere in den Bereichen Sicherheit, Datenmanagement und Kostenkontrolle. Die Sicherheit in einer Multi-Cloud-Umgebung erfordert eine konsistente Anwendung von Sicherheitsrichtlinien und -verfahren über alle Cloud-Dienste hinweg. Datenmanagement in einer Multi-Cloud-Umgebung erfordert effektive Lösungen für Datenintegration, -qualität und -lebenszyklusmanagement, um Silos zu vermeiden und die Datenintegrität zu gewährleisten. Die Kostenkontrolle in Multi-Cloud-Umgebungen erfordert transparente Abrechnungsmodelle und kontinuierliches Monitoring, um unerwartete Kosten zu vermeiden. Durch die Adressierung dieser Herausforderungen mit strategischen Lösungen können Unternehmen die Effizienz und Sicherheit ihrer Multi-Cloud-Plattformen maximieren.

Fotografie auf das nächste Level bringen: Techniken für die professionelle Bildbearbeitung

Fotografie bietet unendlich viele Möglichkeiten, kreativ zu werden und Momente auf einzigartige Weise festzuhalten. Doch um wirklich atemberaubende Bilder zu kreieren, die sich von der Masse abheben, ist oft mehr erforderlich als nur ein gutes Auge für das perfekte Motiv. Fortgeschrittene Techniken für die professionelle Bildbearbeitung können dabei helfen, Ihre Fotos nicht nur zu verbessern, sondern sie in wahre Kunstwerke zu verwandeln. Von der Feinabstimmung der Farben und Kontraste bis hin zur Anwendung kreativer Effekte und der effizienten Verwaltung Ihrer Bilddatenbank – die Beherrschung dieser Fähigkeiten kann Ihre Fotografie auf das nächste Level bringen.

Fortgeschrittene Retusche – komplexe Bildbearbeitungsaufgaben meistern und Fotos perfektionieren

Um komplexe Bildbearbeitungsaufgaben zu meistern und Ihre Fotos zu perfektionieren, ist es wichtig, sich mit fortgeschrittenen Retusche-Techniken vertraut zu machen. Tools wie Adobe Photoshop und Ashampoo Photo Optimizer bieten eine Vielzahl von Funktionen, mit denen Sie Unvollkommenheiten entfernen, die Bildkomposition verbessern und feine Details herausarbeiten können. Die Beherrschung dieser fortgeschrittenen Techniken erfordert Übung und Geduld, doch das Ergebnis sind perfektionierte Fotos, die Ihre künstlerische Vision widerspiegeln.

Kreative Effekte und Filter – innovative Techniken zur Verwandlung Ihrer Bilder in Kunstwerke

Die Anwendung kreativer Effekte und Filter kann Ihre Bilder vollständig transformieren und ihnen einen einzigartigen künstlerischen Touch verleihen. Moderne Bildbearbeitungssoftware bietet eine breite Palette an Filtern und Effekten, von Vintage- oder Filmlooks bis hin zu futuristischen Glitch-Effekten. Experimentieren Sie mit Texturen und Überlagerungen, um Ihren Fotos Tiefe und Charakter zu verleihen. Die Technik des Digital Painting erlaubt es, Fotos so zu bearbeiten, dass sie wie handgemalte Kunstwerke aussehen. Auch die Erstellung von Doppelbelichtungen, bei denen zwei oder mehr Aufnahmen kombiniert werden, bietet faszinierende kreative Möglichkeiten. Der Schlüssel liegt darin, die Balance zwischen Originalität und Ästhetik zu finden und Effekte so einzusetzen, dass sie die Stimmung des Bildes unterstützen und verstärken, anstatt sie zu überwältigen.

Professionelle Farbkorrektur: Tipps zur Anpassung von Farben, Kontrasten und Belichtung für ein ausgewogenes Bildergebnis

Professionelle Farbkorrektur ist entscheidend, um Ihren Fotos ein ausgewogenes und ansprechendes Aussehen zu verleihen. Beginnen Sie mit der Anpassung des Weißabgleichs, um sicherzustellen, dass die Farben natürlich und realistisch aussehen. Nutzen Sie dann die HSL-Regler (Hue, Saturation, Luminance), um die Farbtöne gezielt zu beeinflussen und die Sättigung sowie Helligkeit einzelner Farbbereiche zu steuern. Kurven und Ebenen ermöglichen eine präzise Kontrolle über Kontraste und Lichtverhältnisse, während selektive Farbkorrekturen dazu beitragen, bestimmte Elemente im Bild hervorzuheben oder zurückzunehmen. Eine sorgfältige Farbkorrektur kann das Beste in Ihren Fotos hervorbringen und dafür sorgen, dass die endgültigen Bilder genau Ihrer Vision entsprechen.

Effektive Bildverwaltung und Organisation: Strategien zur effizienten Verwaltung großer Bilddatenbanken und zur Auffindbarkeit Ihrer Fotos

Eine effektive Bildverwaltung und Organisation ist entscheidend, um den Überblick über Ihre wachsende Bilddatenbank zu behalten und schnell auf Ihre Fotos zugreifen zu können. Programme wie Adobe Lightroom bieten leistungsstarke Werkzeuge zur Katalogisierung und Verschlagwortung Ihrer Bilder. Beginnen Sie damit, eine konsistente Benennungsstruktur und Ordnerhierarchie einzuführen. Verwenden Sie Schlagworte, Bewertungen und Farbmarkierungen, um Ihre Fotos effizient zu kategorisieren und die Suche zu vereinfachen. Die Nutzung von Sammlungen und Smart-Sammlungen erlaubt es Ihnen, Fotos thematisch oder nach Projekten zu organisieren, ohne die ursprüngliche Dateistruktur zu verändern. Die regelmäßige Sicherung Ihrer Datenbank ist ebenfalls wichtig, um den Verlust von Fotos zu vermeiden. Durch die Implementierung dieser Strategien können Sie eine effiziente Verwaltung und Organisation Ihrer Bilder sicherstellen, die Zeit spart und Ihre kreative Arbeit unterstützt.

Die professionelle Bildbearbeitung erfordert eine tiefgehende Kenntnis fortgeschrittener Techniken und den effektiven Einsatz von Bildbearbeitungssoftware. Durch das Meistern dieser Fähigkeiten und das kontinuierliche Experimentieren mit neuen Methoden können Sie nicht nur die Qualität Ihrer Fotos verbessern, sondern auch Ihrer Kreativität freien Lauf lassen. Die Investition in eine solide Bildverwaltung und Organisation rundet den Prozess ab und stellt sicher, dass Ihre Kunstwerke sowohl heute als auch in Zukunft zugänglich und geschätzt werden.

Reisen mit Technologie: Auswahlkriterien für die ideale Ausstattung

Wenn Sie ein Technikliebhaber sind, der gerne reist, ist die Wahl der richtigen technologischen Ausrüstung entscheidend, um Ihre Reiseerlebnisse zu bereichern. Ein wesentlicher Bestandteil dieser Ausrüstung ist zweifellos der Laptop. Doch bei der großen Auswahl auf dem Markt kann es eine Herausforderung sein, das ideale Modell zu finden. Wichtige Kriterien sind dabei Mobilität, Leistungsfähigkeit und Akkulaufzeit. Ein leichter, kompakter Laptop, der dennoch leistungsstark genug ist, um alle notwendigen Aufgaben zu bewältigen, ist ideal für unterwegs. Darüber hinaus sollte das Gerät eine lange Akkulaufzeit bieten, um auch auf längeren Reisen oder bei fehlenden Steckdosen zuverlässig zu sein.

Neben dem Laptop selbst spielen auch das richtige Zubehör und ergänzende Gadgets eine entscheidende Rolle. Von tragbaren Ladegeräten über universelle Adapter bis hin zu robusten Schutzhüllen – die richtige Auswahl an Zubehör kann Ihre Reiseerfahrung erheblich verbessern.

Wesentliche Merkmale eines Reise-Laptops: Was bei der Auswahl zu beachten ist

Bei der Auswahl eines Laptops für Reisen sind bestimmte Merkmale besonders wichtig, um sicherzustellen, dass das Gerät Ihren Bedürfnissen entspricht. Ein Reise-Laptop sollte nicht nur leistungsfähig und zuverlässig sein, sondern auch praktische Eigenschaften für Mobilität und Komfort bieten.

  • Gewicht und Größe: Ein leichtes und kompaktes Design ist essentiell. Ultrabooks sind eine ausgezeichnete Wahl, da sie in der Regel dünner und leichter als herkömmliche Laptops sind, ohne dabei an Leistung einzubüßen.
  • Akkulaufzeit: Ein langer Akku ist unerlässlich, besonders wenn Sie lange unterwegs sind oder keinen Zugang zu Steckdosen haben. Suchen Sie nach Modellen mit einer Akkulaufzeit von mindestens 8 Stunden.
  • Robustheit: Ein Reise-Laptop sollte robust genug sein, um den Strapazen des Reisens standzuhalten. Ein widerstandsfähiges Gehäuse und eine gute Verarbeitungsqualität sind wichtige Faktoren.
  • Leistung: Achten Sie auf ausreichende Leistung für Ihre Bedürfnisse. Dies beinhaltet einen schnellen Prozessor, genügend Arbeitsspeicher und ausreichend Speicherplatz.
  • Konnektivitätsoptionen: Vielfältige Anschlussmöglichkeiten wie USB-Ports, HDMI und möglicherweise ein SD-Kartenleser sind nützlich für die Verbindung mit anderen Geräten.
  • Displayqualität: Ein gutes Display mit hoher Auflösung und guter Lesbarkeit auch bei Sonnenlicht ist wichtig, besonders wenn Sie viel im Freien arbeiten.
  • Sicherheitsfeatures: Besonders auf Reisen ist Sicherheit ein wichtiges Thema. Funktionen wie Fingerabdrucksensoren oder verschlüsselte Laufwerke bieten zusätzlichen Schutz für Ihre Daten.

Indem Sie diese Kriterien berücksichtigen, können Sie einen Reise-Laptop finden, der sowohl praktisch als auch leistungsfähig ist und Ihre Reisen produktiver und angenehmer macht. Ein gut ausgewähltes Gerät wird zu einem unverzichtbaren Begleiter auf all Ihren Abenteuern.

Mobilität und Leistung: Wie Sie den richtigen Kompromiss finden

Die Balance zwischen Mobilität und Leistung bei der Wahl eines Laptops erfordert eine sorgfältige Abwägung verschiedener Faktoren. Ein leichter und dünner Laptop ist ideal für unterwegs, könnte jedoch in Bezug auf Leistung und Anschlussmöglichkeiten Einschränkungen mit sich bringen. Ultrabooks bieten hier oft eine gute Mischung, da sie sowohl portabel als auch leistungsstark sind. Eine wichtige Rolle spielt die Akkulaufzeit. Ein Laptop, der eine lange Nutzungsdauer ohne Stromversorgung ermöglicht, erhöht die Mobilität erheblich.

Bei der Leistung kommt es darauf an, dass der Laptop den spezifischen Anforderungen gerecht wird. Ein schneller Prozessor, ausreichend Arbeitsspeicher und genügend Speicherplatz sind für die meisten Aufgaben essentiell. Für spezielle Anwendungen wie Videobearbeitung oder Gaming könnten jedoch leistungsstärkere Komponenten erforderlich sein, was sich wiederum auf Größe und Gewicht auswirken kann.

Die Displayqualität ist ebenfalls ein wichtiger Faktor. Ein hochauflösendes Display, das auch bei unterschiedlichen Lichtverhältnissen gut lesbar ist, trägt zur Produktivität bei, während Features wie Touchscreen oder umklappbare Bildschirme die Flexibilität erhöhen können.

Sicherheitsfeatures und Robustheit sollten nicht vernachlässigt werden, besonders wenn der Laptop häufig unterwegs genutzt wird. Ein widerstandsfähiges Gehäuse und Sicherheitsfunktionen wie Fingerabdrucksensoren oder verschlüsselte Laufwerke bieten zusätzlichen Schutz für die Hardware und die Daten.

Zubehör für den reisenden Technikliebhaber: Unverzichtbare Gadgets für unterwegs

Für Technikliebhaber, die oft unterwegs sind, ist das richtige Zubehör unerlässlich, um die Reise komfortabler und effizienter zu gestalten. Neben einem leistungsfähigen Laptop gibt es eine Reihe von Gadgets, die auf Reisen nicht fehlen sollten.

Ein tragbares Ladegerät ist ein Muss, um sicherzustellen, dass Ihre Geräte auch unterwegs stets einsatzbereit sind. Modelle mit hoher Kapazität können mehrere Geräte gleichzeitig laden und sind ideal für längere Reisen ohne Zugang zu Steckdosen.

Ein weiteres nützliches Gadget ist ein universeller Reiseadapter. Er gewährleistet, dass Sie Ihre Geräte überall auf der Welt aufladen können, ohne sich um unterschiedliche Steckdosenformate sorgen zu müssen. Für die Organisation und den Schutz Ihrer Technik sind spezielle Reisetaschen oder -etuis empfehlenswert. Sie bieten ausreichend Platz für alle Geräte, Kabel und Zubehör und schützen diese vor Beschädigungen.

Noise-Cancelling-Kopfhörer sind ideal, um sich auf langen Flügen oder in lauten Umgebungen zu entspannen und ungestört Musik zu hören oder zu arbeiten. Zuletzt sind externe Festplatten oder Cloud-Speicherlösungen wichtig, um wichtige Daten zu sichern und jederzeit darauf zugreifen zu können.

Netplan brings consistent network configuration across Desktop, Server, Cloud and IoT

Ubuntu 23.10 “Mantic Minotaur” Desktop, showing network settings

We released Ubuntu 23.10 ‘Mantic Minotaur’ on 12 October 2023, shipping its proven and trusted network stack based on Netplan. Netplan is the default tool to configure Linux networking on Ubuntu since 2016. In the past, it was primarily used to control the Server and Cloud variants of Ubuntu, while on Desktop systems it would hand over control to NetworkManager. In Ubuntu 23.10 this disparity in how to control the network stack on different Ubuntu platforms was closed by integrating NetworkManager with the underlying Netplan stack.

Netplan could already be used to describe network connections on Desktop systems managed by NetworkManager. But network connections created or modified through NetworkManager would not be known to Netplan, so it was a one-way street. Activating the bidirectional NetworkManager-Netplan integration allows for any configuration change made through NetworkManager to be propagated back into Netplan. Changes made in Netplan itself will still be visible in NetworkManager, as before. This way, Netplan can be considered the “single source of truth” for network configuration across all variants of Ubuntu, with the network configuration stored in /etc/netplan/, using Netplan’s common and declarative YAML format.

Netplan Desktop integration

On workstations, the most common scenario is for users to configure networking through NetworkManager’s graphical interface, instead of driving it through Netplan’s declarative YAML files. Netplan ships a “libnetplan” library that provides an API to access Netplan’s parser and validation internals, which is now used by NetworkManager to store any network interface configuration changes in Netplan. For instance, network configuration defined through NetworkManager’s graphical UI or D-Bus API will be exported to Netplan’s native YAML format in the common location at /etc/netplan/. This way, the only thing administrators need to care about when managing a fleet of Desktop installations is Netplan. Furthermore, programmatic access to all network configuration is now easily accessible to other system components integrating with Netplan, such as snapd. This solution has already been used in more confined environments, such as Ubuntu Core and is now enabled by default on Ubuntu 23.10 Desktop.

Migration of existing connection profiles

On installation of the NetworkManager package (network-manager >= 1.44.2-1ubuntu1) in Ubuntu 23.10, all your existing connection profiles from /etc/NetworkManager/system-connections/ will automatically and transparently be migrated to Netplan’s declarative YAML format and stored in its common configuration directory /etc/netplan/

The same migration will happen in the background whenever you add or modify any connection profile through the NetworkManager user interface, integrated with GNOME Shell. From this point on, Netplan will be aware of your entire network configuration and you can query it using its CLI tools, such as “sudo netplan get” or “sudo netplan status” without interrupting traditional NetworkManager workflows (UI, nmcli, nmtui, D-Bus APIs). You can observe this migration on the apt-get command line, watching out for logs like the following:

Setting up network-manager (1.44.2-1ubuntu1.1) ...
Migrating HomeNet (9d087126-ae71-4992-9e0a-18c5ea92a4ed) to /etc/netplan
Migrating eduroam (37d643bb-d81d-4186-9402-7b47632c59b1) to /etc/netplan
Migrating DebConf (f862be9c-fb06-4c0f-862f-c8e210ca4941) to /etc/netplan

In order to prepare for a smooth transition, NetworkManager tests were integrated into Netplan’s continuous integration pipeline at the upstream GitHub repository. Furthermore, we implemented a passthrough method of handling unknown or new settings that cannot yet be fully covered by Netplan, making Netplan future-proof for any upcoming NetworkManager release.

The future of Netplan

Netplan has established itself as the proven network stack across all variants of Ubuntu – Desktop, Server, Cloud, or Embedded. It has been the default stack across many Ubuntu LTS releases, serving millions of users over the years. With the bidirectional integration between NetworkManager and Netplan the final piece of the puzzle is implemented to consider Netplan the “single source of truth” for network configuration on Ubuntu. With Debian choosing Netplan to be the default network stack for their cloud images, it is also gaining traction outside the Ubuntu ecosystem and growing into the wider open source community.

Within the development cycle for Ubuntu 24.04 LTS, we will polish the Netplan codebase to be ready for a 1.0 release, coming with certain guarantees on API and ABI stability, so that other distributions and 3rd party integrations can rely on Netplan’s interfaces. First steps into that direction have already been taken, as the Netplan team reached out to the Debian community at DebConf 2023 in Kochi/India to evaluate possible synergies.

Conclusion

Netplan can be used transparently to control a workstation’s network configuration and plays hand-in-hand with many desktop environments through its tight integration with NetworkManager. It allows for easy network monitoring, using common graphical interfaces and provides a “single source of truth” to network administrators, allowing for configuration of Ubuntu Desktop fleets in a streamlined and declarative way. You can try this new functionality hands-on by following the “Access Desktop NetworkManager settings through Netplan” tutorial.


If you want to learn more, feel free to follow our activities on Netplan.io, GitHub, Launchpad, IRC or our Netplan Developer Diaries blog on discourse.

Netplan v0.107 is now available

I’m happy to announce that Netplan version 0.107 is now available on GitHub and is soon to be deployed into a Linux installation near you! Six months and more than 200 commits after the previous version (including a .1 stable release), this release is brought to you by 8 free software contributors from around the globe.

Highlights

Highlights of this release include the new configuration types for veth and dummy interfaces:

network:
  version: 2
  virtual-ethernets:
    veth0:
      peer: veth1
    veth1:
      peer: veth0
  dummy-devices:
    dm0:
      addresses:
        - 192.168.0.123/24
      ...

Furthermore, we implemented CFFI based Python bindings on top of libnetplan’s API, that can easily be consumed by 3rd party applications (see full cffi-bindings.py example):

from netplan import Parser, State, NetDefinition
from netplan import NetplanException, NetplanParserException

parser = Parser()

# Parse the full, existing YAML config hierarchy
parser.load_yaml_hierarchy(rootdir='/')

# Validate the final parser state
state = State()
try:
    # validation of current state + new settings
    state.import_parser_results(parser)
except NetplanParserException as e:
    print('Error in', e.filename, 'Row/Col', e.line, e.column, '->', e.message)
except NetplanException as e:
    print('Error:', e.message)

# Walk through ethernet NetdefIDs in the state and print their backend
# renderer, to demonstrate working with NetDefinitionIterator &
# NetDefinition
for netdef in state.ethernets.values():
    print('Netdef', netdef.id, 'is managed by:', netdef.backend)
    print('Is it configured to use DHCP?', netdef.dhcp4 or netdef.dhcp6)

Changelog:

Bug fixes:

A declarative approach to Linux networking with Netplan

Photo by Taylor Vick (Unsplash)

Linux networking can be confusing due to the wide range of technology stacks and tools in use, in addition to the complexity of the surrounding network environment. The configuration of bridges, bonds, VRFs or routes can be done programmatically, declaratively, manually or with automated with tools like ifupdown, ifupdown2, ifupdown-ng, iproute2, NetworkManager, systemd-networkd and others. Each  of these tools use different formats and locations to store their configuration files. Netplan, a utility for easily configuring networking on a Linux system, is designed to unify and standardise how administrators interact with these underlying technologies. Starting from a YAML description of the required network interfaces and what each should be configured to do, Netplan will generate all the necessary configuration for your chosen tool.

In this article, we will provide an overview of how Ubuntu uses Netplan to manage Linux networking in a unified way. By creating a common interface across two disparate technology stacks, IT administrators benefit from a unified experience across both desktops and servers whilst retaining the unique advantages of the underlying tech.

But first, let’s start with a bit of history and show where we are today.

The history of Netplan in Ubuntu

Starting with Ubuntu 16.10 and driven by the need to express network configuration in a common way across cloud metadata and other installer systems, we had the opportunity to switch to a network stack that integrates better with our dependency-based boot model. We chose systemd-networkd on server installations for its active upstream community and because it was already part of Systemd and therefore included in any Ubuntu base installation. It has a much better outlook for the future, using modern development techniques, good test coverage and CI integration, compared to the ifupdown tool we used previously. On desktop installations, we kept using NetworkManager due to its very good integration with the user interface.

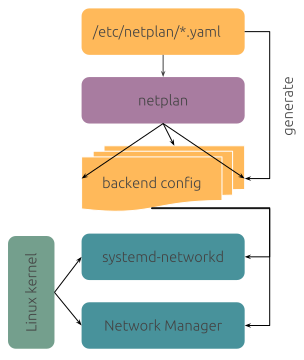
Having to manage and configure two separate network stacks, depending on the Ubuntu variant in use, can be confusing, and we wanted to provide a streamlined user experience across any flavour of Ubuntu. Therefore, we introduced Netplan.io as a control layer above systemd-networkd and NetworkManager. Netplan takes declarative YAML files from /etc/netplan/ as an input and generates corresponding network configuration for the relevant network stack backend in /run/systemd/network/ or /run/NetworkManager/ depending on the system configuration. All while keeping full flexibility to control the underlying network stack in its native way if need be.

Design overview (netplan.io)

Who is using Netplan?

Recent versions of Netplan are available and ready to be installed on many distributions, such as Ubuntu, Fedora, RedHat Enterprise Linux, Debian and Arch Linux.

Ubuntu

As stated above, Netplan has been installed by default on Ubuntu systems since 2016 and is therefore being used by millions of users across multiple long-term support versions of Ubuntu (18.04, 20.04, 22.04) on a day-to-day basis. This covers Ubuntu server scenarios primarily, such as bridges, bonding, VLANs, VXLANs, VRFs, IP tunnels or WireGuard tunnels, using systemd-networkd as the backend renderer.

On Ubuntu desktop systems, Netplan can be used manually through its declarative YAML configuration files, and it will handle those to configure the NetworkManager stack. Keep reading to get a glimpse of how this will be improved through automation and integration with the desktop stack in the future.

Cloud

It might not be as obvious, but many people have been using Netplan without knowing about it when configuring a public cloud instance on AWS, Google Cloud or elsewhere through cloud-init. This is because cloud-init’s “Networking Config Version 2” is a passthrough configuration to Netplan, which will then set up the underlying network stack on the given cloud instance. This is why Netplan is also a key package on the Debian distribution, for example, as it’s being used by default on Debian cloud images, too.

Our vision for Linux networking

We know that Linux networking can be a beast, and we want to keep simple things simple. But also allow for custom setups of any complexity. With Netplan, the day-to-day networking needs are covered through easily comprehensible and nicely documented YAML files, that describe the desired state of the local network interfaces, which will be rendered into corresponding configuration files for the relevant network stack and applied at (re-)boot or at runtime, using the “netplan apply” CLI. For example /etc/netplan/lan.yaml:

network:
  version: 2
  renderer: networkd
  ethernets:
    enp3s0:
      dhcp4: true

Having a single source of truth for network configuration is also important for administrators, so they do not need to understand multiple network stacks, but can rely on the declarative data given in /etc/netplan/ to configure a system, independent of the underlying network configuration backend. This is also very helpful to seed the initial network configuration for new Linux installations, for example through installation systems such as Subiquity, Ubuntu’s desktop installer or cloud-init across the public and private clouds.

In addition to describing and applying network configuration, the “netplan status” CLI can be used to query relevant data from the underlying network stack(s), such as systemd-networkd, NetworkManager or iproute2, and present them in a unified way.

Netplan status (Debian)

At the Netplan project we strive for very high test automation and coverage with plenty of unit tests, integration tests and linting steps, across multiple Linux distros, which gives high confidence in also supporting more advanced networking use cases, such as Open vSwitch or SR-IOV network virtualization, in addition to normal wired (static IP, DHCP, routing), wireless (e.g. wwan modems, WPA2/3 connections, WiFi hotspot, controlling the regulatory domain, …) and common server scenarios.

Should there ever be a scenario that is not covered by Netplan natively, it allows for full flexibility to control the underlying network stack directly through systemd override configurations or NetworkManager passthrough settings in addition to having manual configuration side-by-side with interfaces controlled through Netplan.

The future of Netplan desktop integration

On workstations, the most common scenario is for end users to configure NetworkManager through its user interface tools, instead of driving it through Netplan’s declarative YAML files, which makes use of NetworkManager’s native configuration files. To avoid Netplan just handing over control to NetworkManager on such systems, we’re working on a bidirectional integration between NetworkManager and Netplan to further improve the “single source of truth” use case on Ubuntu desktop installations.

Netplan is shipping a “libnetplan” library that provides an API to access Netplan’s parser and validation internals, that can be used by NetworkManager to write back a network interface configuration. For instance, configuration given through NetworkManager’s UI tools or D-Bus API can be exported to Netplan’s native YAML format in the common location at /etc/netplan/. This way, administrators just need to care about Netplan when managing a fleet of Desktop installations. This solution is currently being used in more confined environments, like Ubuntu Core, when using the NetworkManager snap, and we will deliver it to generic Ubuntu desktop systems in 24.04 LTS.

In addition to NetworkManager, libnetplan can also be used to integrate with other tools in the networking space, such as cloud-init for improved validation of user data or installation systems when seeding new Linux images.

Conclusion

Overall, Netplan can be considered to be a good citizen within a network environment that plays hand-in-hand with other networking tools and makes it easy to control modern network stacks, such as systemd-networkd or NetworkManager in a common, streamlined and declarative way. It provides a “single source of truth” to network administrators about the network state, while keeping simple things simple, but allowing for arbitrarily complex custom setups.
If you want to learn more, feel free to follow our activities on Netplan.io, GitHub, Launchpad, IRC or our Netplan Developer Diaries blog on discourse.