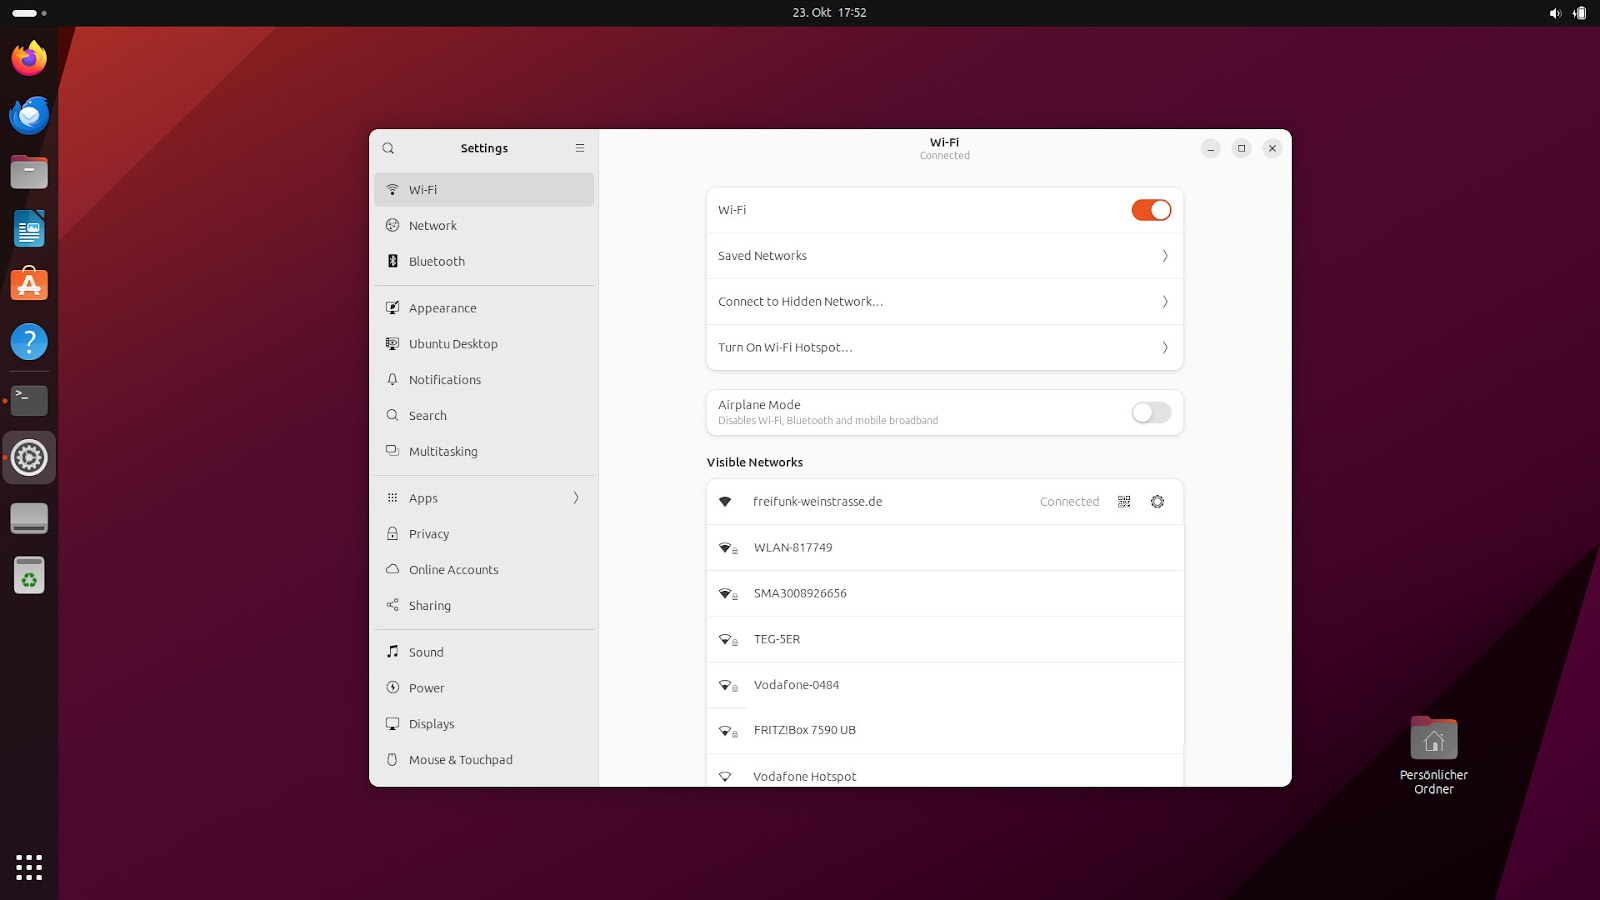
Ubuntu 23.10 “Mantic Minotaur” Desktop, showing network settings
We released Ubuntu 23.10 ‘Mantic Minotaur’ on 12 October 2023, shipping its proven and trusted network stack based on Netplan. Netplan is the default tool to configure Linux networking on Ubuntu since 2016. In the past, it was primarily used to control the Server and Cloud variants of Ubuntu, while on Desktop systems it would hand over control to NetworkManager. In Ubuntu 23.10 this disparity in how to control the network stack on different Ubuntu platforms was closed by integrating NetworkManager with the underlying Netplan stack.
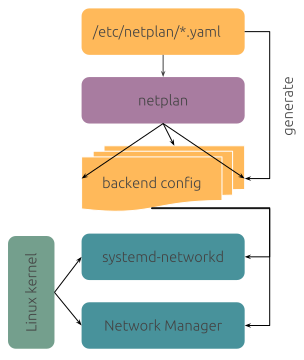
Netplan could already be used to describe network connections on Desktop systems managed by NetworkManager. But network connections created or modified through NetworkManager would not be known to Netplan, so it was a one-way street. Activating the bidirectional NetworkManager-Netplan integration allows for any configuration change made through NetworkManager to be propagated back into Netplan. Changes made in Netplan itself will still be visible in NetworkManager, as before. This way, Netplan can be considered the “single source of truth” for network configuration across all variants of Ubuntu, with the network configuration stored in /etc/netplan/, using Netplan’s common and declarative YAML format.
Netplan Desktop integration
On workstations, the most common scenario is for users to configure networking through NetworkManager’s graphical interface, instead of driving it through Netplan’s declarative YAML files. Netplan ships a “libnetplan” library that provides an API to access Netplan’s parser and validation internals, which is now used by NetworkManager to store any network interface configuration changes in Netplan. For instance, network configuration defined through NetworkManager’s graphical UI or D-Bus API will be exported to Netplan’s native YAML format in the common location at /etc/netplan/. This way, the only thing administrators need to care about when managing a fleet of Desktop installations is Netplan. Furthermore, programmatic access to all network configuration is now easily accessible to other system components integrating with Netplan, such as snapd. This solution has already been used in more confined environments, such as Ubuntu Core and is now enabled by default on Ubuntu 23.10 Desktop.
Migration of existing connection profiles
On installation of the NetworkManager package (network-manager >= 1.44.2-1ubuntu1) in Ubuntu 23.10, all your existing connection profiles from /etc/NetworkManager/system-connections/ will automatically and transparently be migrated to Netplan’s declarative YAML format and stored in its common configuration directory /etc/netplan/.
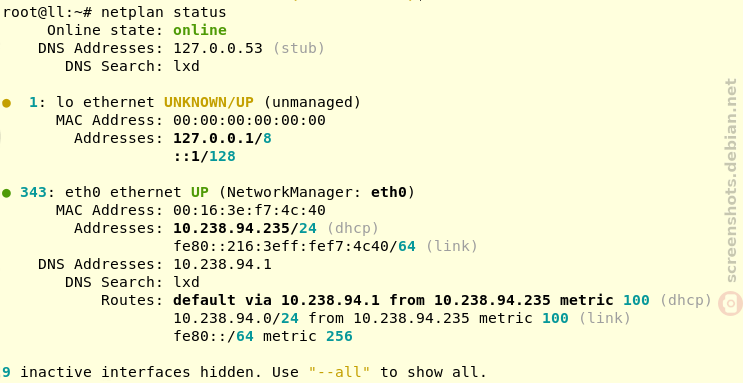
The same migration will happen in the background whenever you add or modify any connection profile through the NetworkManager user interface, integrated with GNOME Shell. From this point on, Netplan will be aware of your entire network configuration and you can query it using its CLI tools, such as “sudo netplan get” or “sudo netplan status” without interrupting traditional NetworkManager workflows (UI, nmcli, nmtui, D-Bus APIs). You can observe this migration on the apt-get command line, watching out for logs like the following:
Setting up network-manager (1.44.2-1ubuntu1.1) ...
Migrating HomeNet (9d087126-ae71-4992-9e0a-18c5ea92a4ed) to /etc/netplan
Migrating eduroam (37d643bb-d81d-4186-9402-7b47632c59b1) to /etc/netplan
Migrating DebConf (f862be9c-fb06-4c0f-862f-c8e210ca4941) to /etc/netplan
In order to prepare for a smooth transition, NetworkManager tests were integrated into Netplan’s continuous integration pipeline at the upstream GitHub repository. Furthermore, we implemented a passthrough method of handling unknown or new settings that cannot yet be fully covered by Netplan, making Netplan future-proof for any upcoming NetworkManager release.
The future of Netplan
Netplan has established itself as the proven network stack across all variants of Ubuntu – Desktop, Server, Cloud, or Embedded. It has been the default stack across many Ubuntu LTS releases, serving millions of users over the years. With the bidirectional integration between NetworkManager and Netplan the final piece of the puzzle is implemented to consider Netplan the “single source of truth” for network configuration on Ubuntu. With Debian choosing Netplan to be the default network stack for their cloud images, it is also gaining traction outside the Ubuntu ecosystem and growing into the wider open source community.
Within the development cycle for Ubuntu 24.04 LTS, we will polish the Netplan codebase to be ready for a 1.0 release, coming with certain guarantees on API and ABI stability, so that other distributions and 3rd party integrations can rely on Netplan’s interfaces. First steps into that direction have already been taken, as the Netplan team reached out to the Debian community at DebConf 2023 in Kochi/India to evaluate possible synergies.
Conclusion
Netplan can be used transparently to control a workstation’s network configuration and plays hand-in-hand with many desktop environments through its tight integration with NetworkManager. It allows for easy network monitoring, using common graphical interfaces and provides a “single source of truth” to network administrators, allowing for configuration of Ubuntu Desktop fleets in a streamlined and declarative way. You can try this new functionality hands-on by following the “Access Desktop NetworkManager settings through Netplan” tutorial.
If you want to learn more, feel free to follow our activities on Netplan.io, GitHub, Launchpad, IRC or our Netplan Developer Diaries blog on discourse.