I’m happy to announce that Netplan version 0.107 is now available on GitHub and is soon to be deployed into a Linux installation near you! Six months and more than 200 commits after the previous version (including a .1 stable release), this release is brought to you by 8 free software contributors from around the globe.
Highlights
Highlights of this release include the new configuration types for veth and dummy interfaces:
network:
  version: 2
  virtual-ethernets:
    veth0:
      peer: veth1
    veth1:
      peer: veth0
  dummy-devices:
    dm0:
      addresses:
        - 192.168.0.123/24
      ...
Furthermore, we implemented CFFI based Python bindings on top of libnetplan’s API, that can easily be consumed by 3rd party applications (see full cffi-bindings.py example):
from netplan import Parser, State, NetDefinition from netplan import NetplanException, NetplanParserExceptionparser = Parser() # Parse the full, existing YAML config hierarchy parser.load_yaml_hierarchy(rootdir='/') # Validate the final parser state state = State() try: # validation of current state + new settings state.import_parser_results(parser) except NetplanParserException as e: print('Error in', e.filename, 'Row/Col', e.line, e.column, '->', e.message) except NetplanException as e: print('Error:', e.message) # Walk through ethernet NetdefIDs in the state and print their backend # renderer, to demonstrate working with NetDefinitionIterator & # NetDefinition for netdef in state.ethernets.values(): print('Netdef', netdef.id, 'is managed by:', netdef.backend) print('Is it configured to use DHCP?', netdef.dhcp4 or netdef.dhcp6)
Changelog:
- Support for “dummy” (
dummy-devices) interfaces (LP#1774203) by @daniloegea in #361 - Support for “veth” (
virtual-ethernets) interfaces by @daniloegea in #368 - Add Python bindings for libnetplan by @slyon in #385
- netplan: Handle command exceptions by @daniloegea in #334
- WPA3 (personal) support (LP#2023238) by @daniloegea in #369
- Add all the commands to the bash completion file (LP#1749869) by @daniloegea in #326
- New submodule for state manipulation by @daniloegea in #379
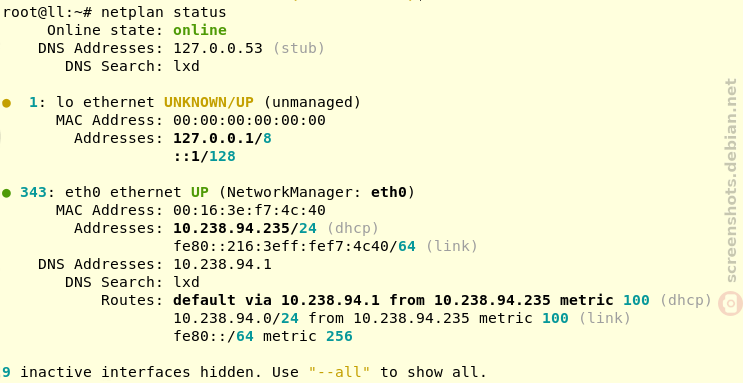
- commands/status: show routes from all routing tables by @daniloegea in #390
- cli:status: Make rich pretty printing optional by @slyon in #388
- libnetplan: expose dhcp4 and dhcp6 properties by @daniloegea in #394
- Expose macaddress and DNS configuration from the netdef by @daniloegea in #395
- libnetplan: expose the routes list in the netdef by @daniloegea in #397
- NetworkManager: Wireguard private key flag support by @daniloegea in #371
- Add a netplan_parser_load_keyfile() Python binding by @daniloegea in #351
- keyfile parser: add support for all tunnel types (LP#2016473) by @daniloegea in #360
- parse-nm:wg: add support for reading the listen-port property by @daniloegea in #372
- parse-nm: add support for VRF devices by @daniloegea in #398
- Vlan keyfile parser support by @daniloegea in #370
- Netplan docs rework by @daniloegea in #333 & #337
- docs: Add a short netplan-everywhere howto by @daniloegea in #325
- doc: make us of sphinx copybutton plugin by @slyon in #354
- doc: Add Ubuntu Code of Conduct 2.0 by @slyon in #355
- doc: Explanation about 00-network-manager-all.yaml by @slyon in #378
Bug fixes:
- Fix FTBFS on Fedora and refresh RPM packaging by @Conan-Kudo in #323
- parser: validate lacp-rate properly (LP#1745648) by @daniloegea in #324
- meson: use meson-make-symlink.sh helper script instead of install_symlink() by @slyon in #327
- netplan: cli: fix typo from ‘unkown’ to ‘unknown’ by @AristoChen in #328
- Handle duplication during parser second pass (LP#2007682) by @daniloegea in #329
- parse:ovs: Ignore deprecated OpenFlow1.6 protocol (LP#1963735) by @slyon in #332
- dbus: Build the copy path correctly by @daniloegea in #331
- tests: add new spread based snapd integration test by @mvo5 in #330
- Use controlled execution environment, to avoid failure if PATH is unset (LP#1959570) by @slyon in #336
- Some refactoring by @slyon in #338
- netplan: adjust the maximum buffer size to 1MB by @daniloegea in #340
- parse: use “–” with systemd-escape by @daniloegea in #347
- docs: fix bridge parameters types and add examples by @daniloegea in #346
- vrfs: skip policies parsing if list is NULL (LP#2016427) by @daniloegea in #341
- networkd: plug a memory leak by @daniloegea in #344
- libnetplan: don’t try to read from a NULL file by @daniloegea in #342
- nm: return if write_routes() fails by @daniloegea in #345
- parse: plug a memory leak by @daniloegea in #348
- parse: set the backend on nm-devices to NM by default by @daniloegea in #349
- parse: don’t point to the wrong node on validation by @daniloegea in #343
- rtd: set the OS and Python versions explicitly by @daniloegea in #357
- Fix 8021x eap method parsing (LP#2016625) by @daniloegea in #358
- CI: update canonical/setup-lxd to v0.1.1 by @barrettj12 in #359
- CI: fix dch after adding the new 0.106.1 tag by @daniloegea in #364
- Provide frequency to wpa_supplicant when in adhoc mode (LP#2020754) by @yevmel in #363
- Improve the coverage of the memory leak tests by @daniloegea in #365
- Fix keyfile parsing of wireguard config when the prefix of allowed IPs is omited by @daniloegea in #366
- routes: fix metric rendering (LP#2023681) by @bengentil in #367
- CI: add DebCI integration test by @slyon in #362
- CI: initial NetworkManager autopkgtests by @slyon in #374
- parse-nm: handle cloned-mac-address special cases (LP#2026230) by @daniloegea in #376
- Improve autopkgtest stability with systemd 253 & iproute 6.4 by @slyon in #377
- Fixes for minor issues by @daniloegea in #380
- tests:integration: Adopt for systemd v254 (Closes: #1041310) by @slyon in #381
- parse: Downgrade NM passthrough warning to debug by @slyon in #384
- netplan.c: Don’t drop files with just global values on ‘set’ (LP#2027584) by @slyon in #382
- Fixing Coverity issues by @daniloegea in #383
- CLI: Refactoring to avoid namespace clash with public bindings by @slyon in #387
- tests: fix test coverage report with newer python-coverage by @daniloegea in #389
- github: add a scheduled action to run Coverity by @daniloegea in #391
- github: only run the coverity workflow on our repository by @daniloegea in #392
- Addressing a few issues found by coverity by @daniloegea in #393
- Wireguard fixes by @daniloegea in #352
- Fix a memory leak, an assert and an error message by @daniloegea in #350
- ovs: don’t allow peers with the same name by @daniloegea in #353
- CI: make use of the canonical/setup-lxd action by @slyon in #356