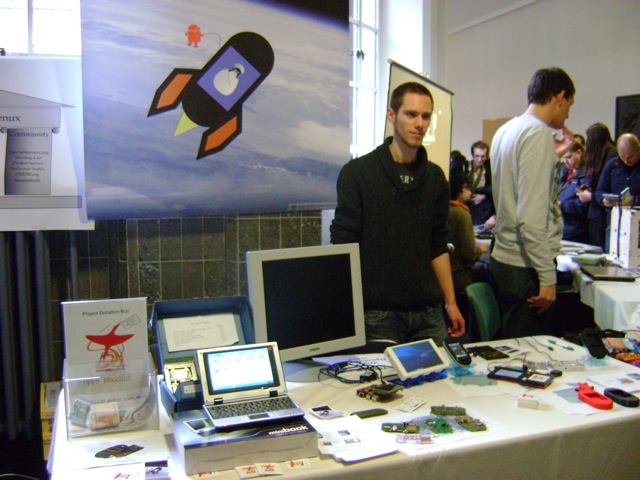
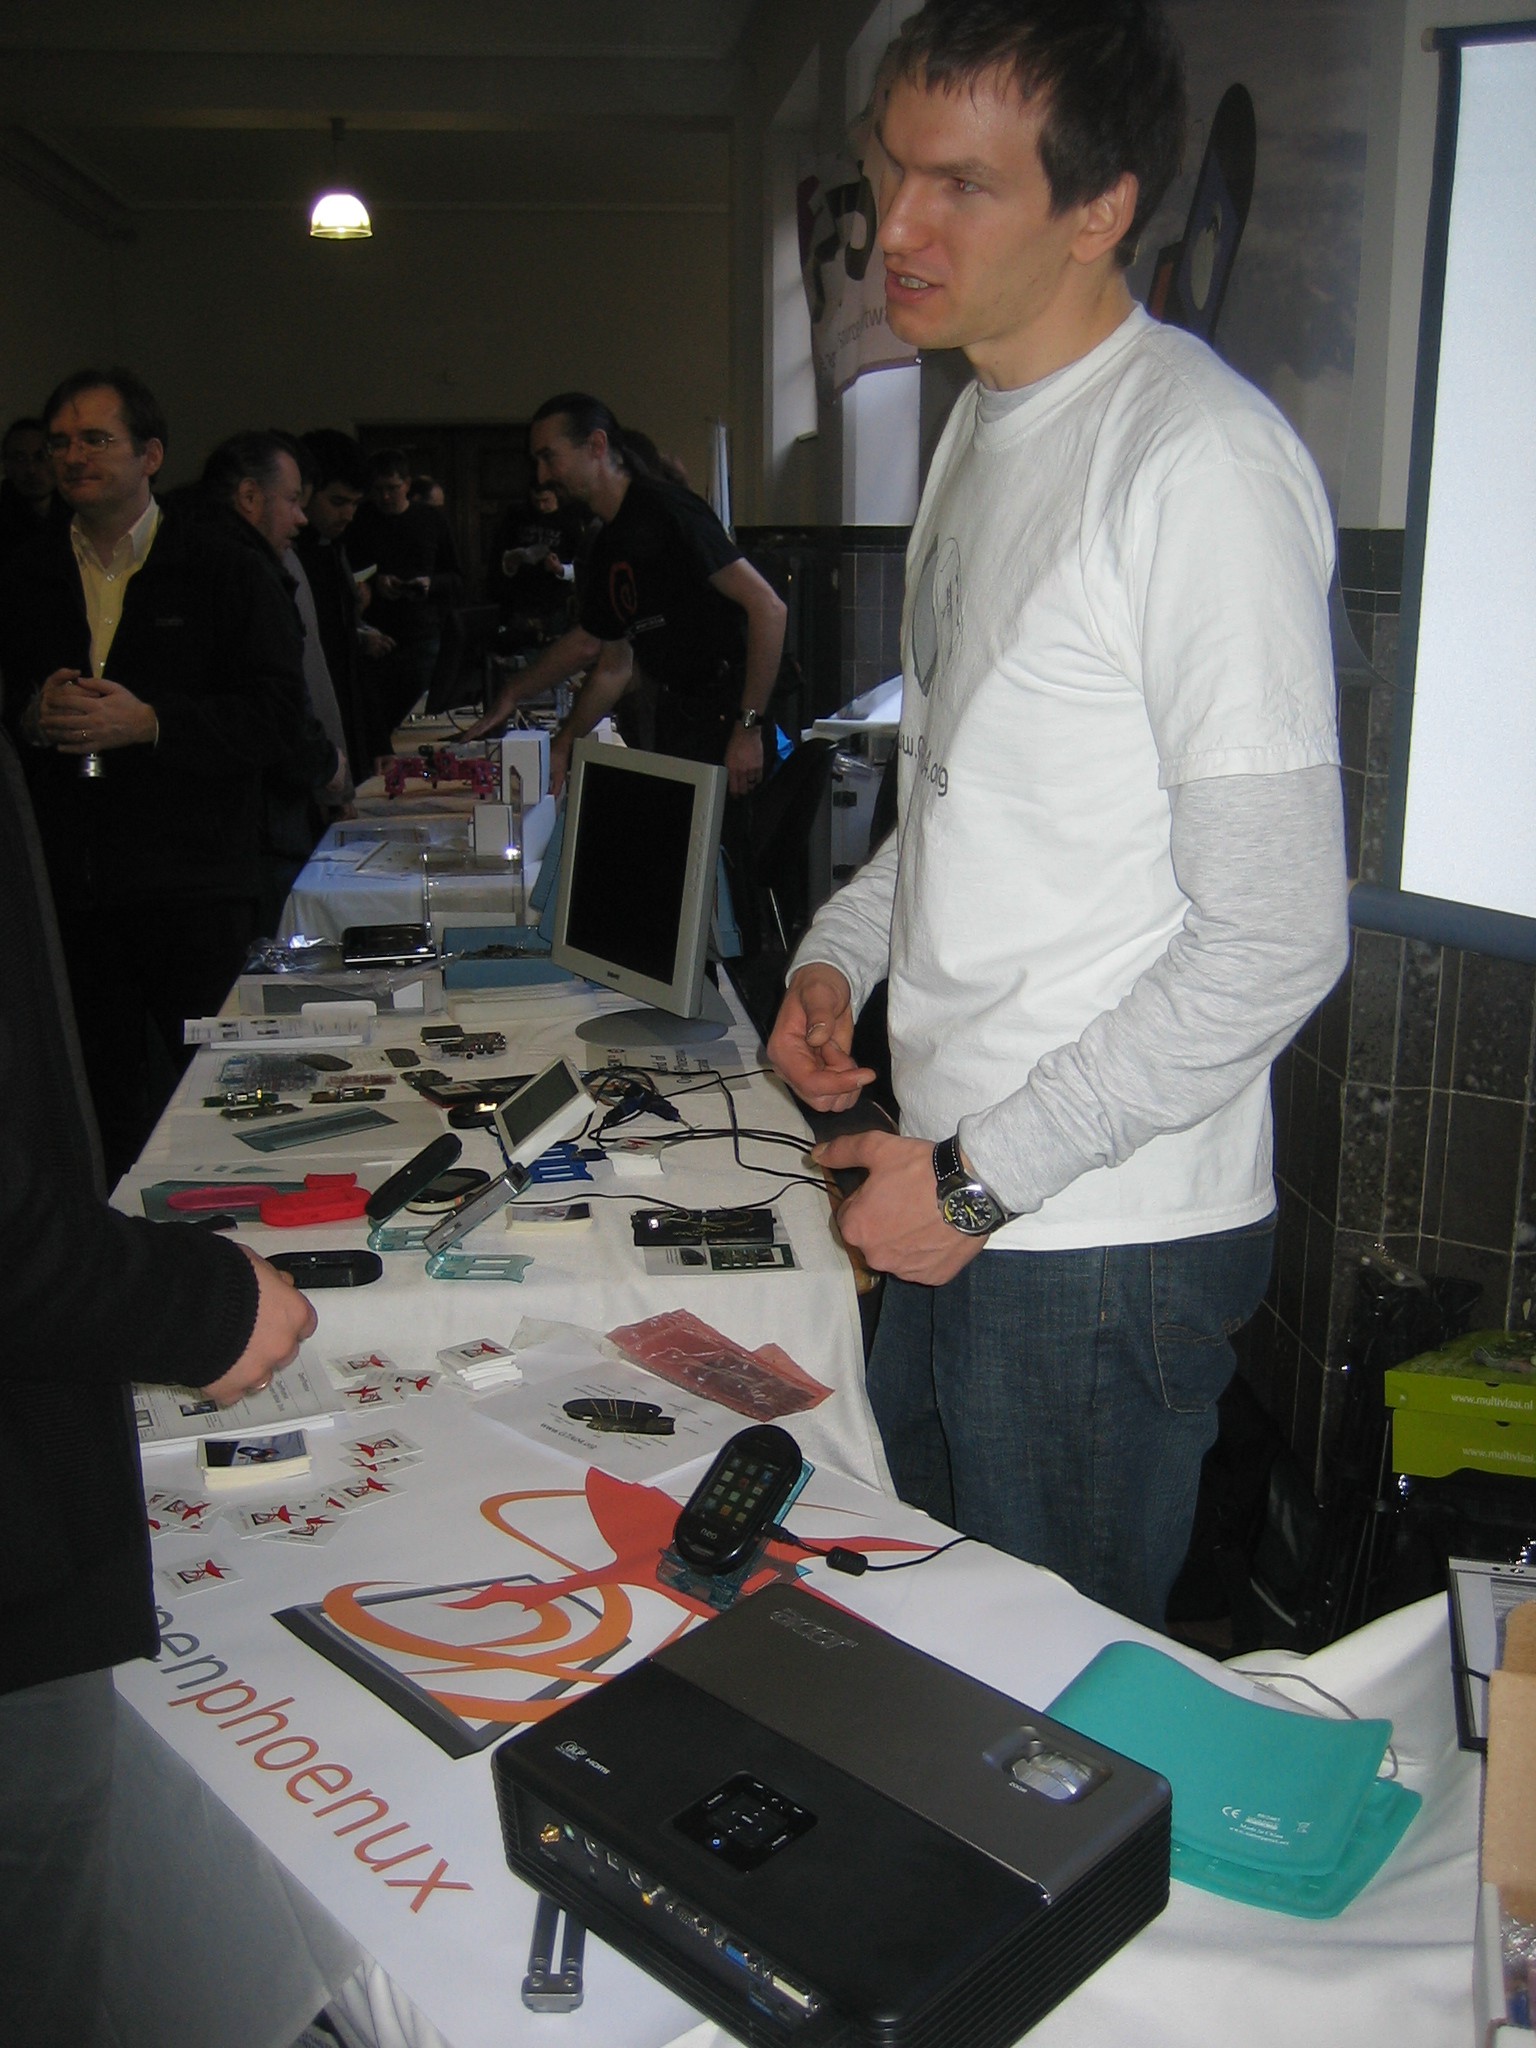
FOSDEM 2013 is over and I had a really nice time again at Brussels, together with the OpenPhoenux/GTA04 team. It was especially nice to meet some people from our community in person and discuss interesting ideas with them.
Furthermore, it was great to meet people, who didn’t know about neither OpenPhoenux nor Openmoko, having cool ideas, which the OpenPhoenux GTA04 open hardware plattform would enable them to do.
We even got interviewed by Sam – a moviemaker, ceating a movie called “Year of Open Source” about living in a free software/hardware world for (at least) one year.
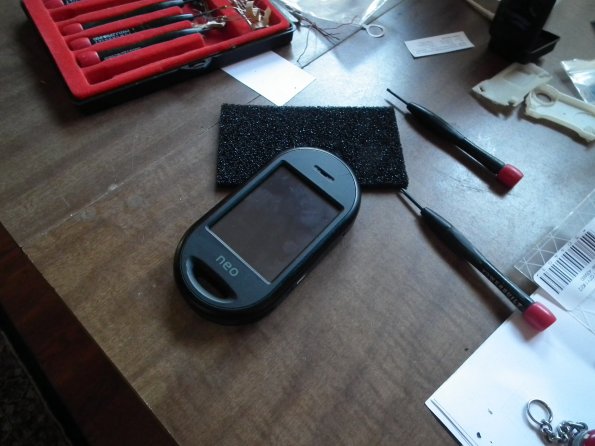
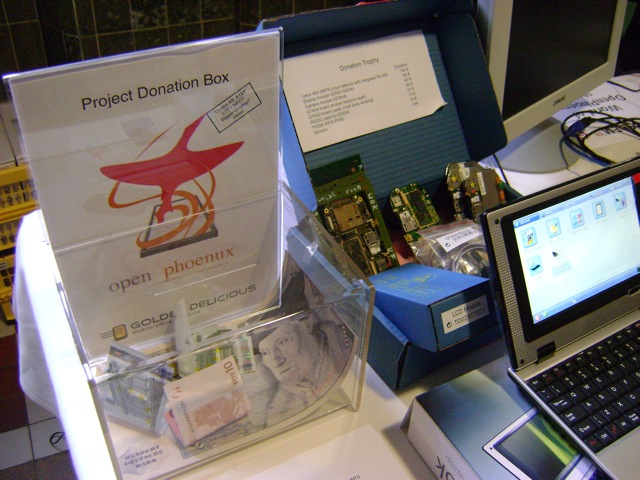
As stated, I had a nice time and I’m looking forward to meeting with the OpenPhoenux community soon again. Now, as a picture says more than 1000 words, here are some photographs from our FOSDEM booth:
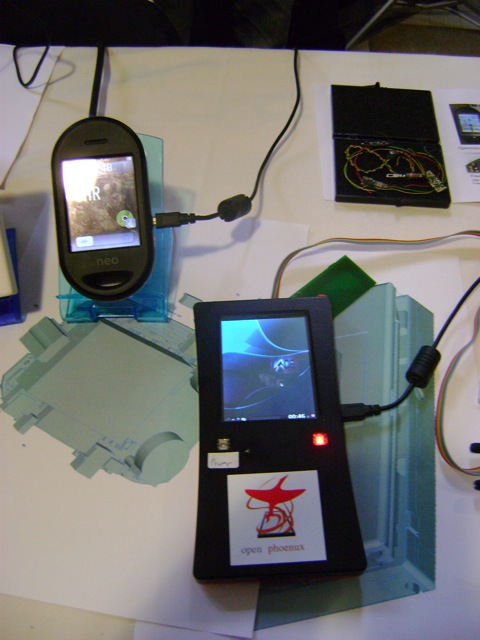
The team of OpenPhoenux presented the development process of the open hardware and free software powered mobile plattform “GTA04” at FOSDEM 2011 and 2012, including working prototypes and preview-boards for developers.
Now, that the OpenPhoenux has taken off to reach a broader audience, we’ll show off all the open hardware (prototypes of new products and finished devices) at FOSDEM 2013. We hope you’re already eager to have your hands on the latest and greatest open mobile handhelds, which will be presented at our booth!
In addition, there are still a few complete GTA04 (revision A4) smartphone units on stock at the Openmoko reseller Pulster.eu. Contact him for further information.
Those are all great hardware projects for Linux/FOSS enthusiasts and freedom lovers! But the World of OpenPhoenux is not limited to hardware gadgets, but is connected to several other open mobile and communication projects, as well:
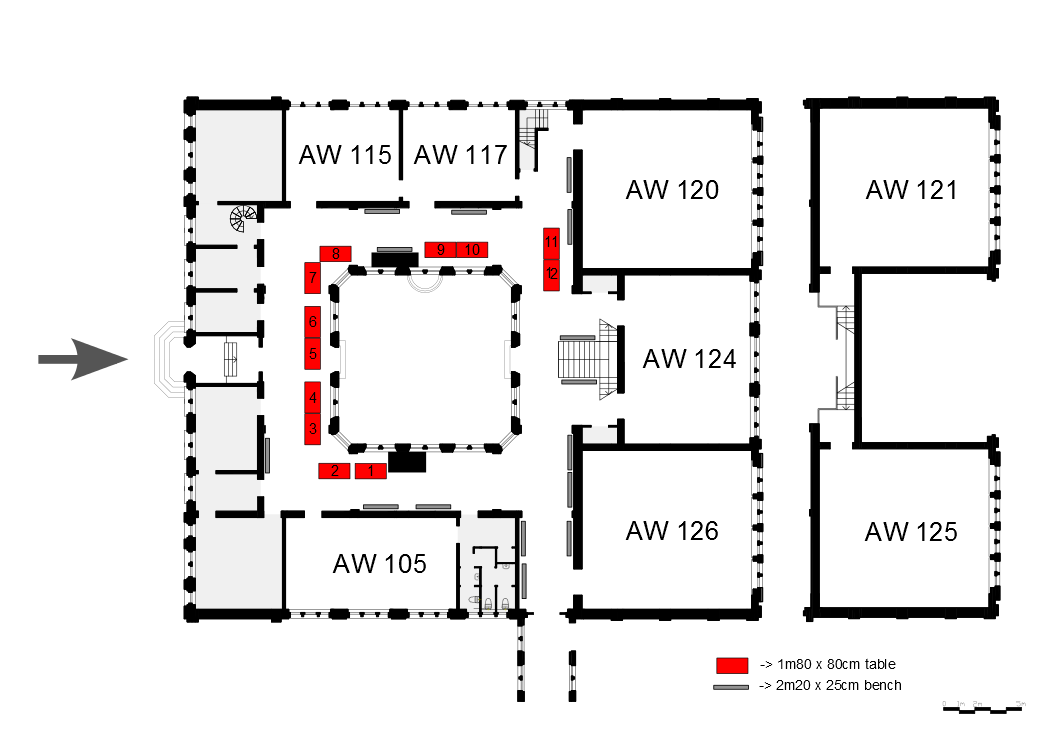
So, if you’re visiting FOSDEM this year and are interested in open mobile communications it is a must to drop by the “World of OpenPhoenux”-booth (No. 3) in building AW, right next to Jolla/Sailfish, Hackable Devices/MakerBot, Enlightenment and more!
We’re looking forward to meet you there, answer your questions and demo the devices to you!
“If you have an apple and I have an apple and we exchange these apples then you and I will still each have one apple. But if you have an idea and I have an idea and we exchange these ideas, then each of us will have two ideas.”
All started off after Openmoko Inc. began to ship the Openmoko Neo 1973 (GTA01) and Neo Freerunner (GTA02) in 2007, which are fully open source smartphones. A dream became true for many open source lovers and technology enthusiasts at that time.
Sadly, Openmoko Inc. canceled their efforts for an open smartphone in 2009. But due to their openness (schematics, hardware specifications, software) it was possible for enthusiasts from the Openmoko community, with great support from Golden Delicious Computers (one of the german Openmoko distributors), to develop a new and modern open smartphone – the OpenPhoenux GTA04.
USB 2.0 OTG port, 2.5mm headset port, GPS antenna port, video out
Prototypes & First production run (2012)
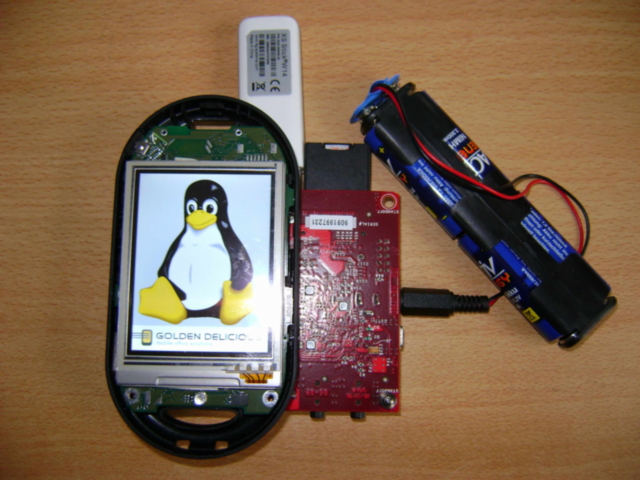
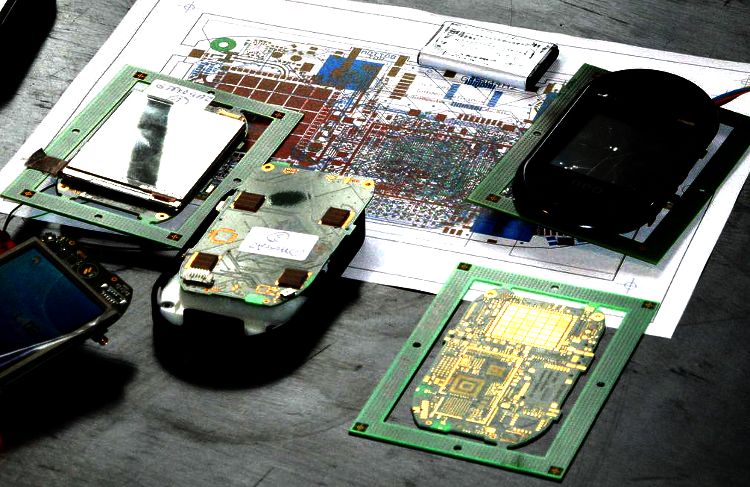
Golden Delicious Computers and the enthusiasts from the Openmoko community started off with the idea of stuffing a BeagleBoard into a Neo Freerunner case and connecting an USB UMTS dongle to it – this was the first prototype GTA04A1, announced in late 2010 and presented at OHSW 2010 and FOSDEM 2011.
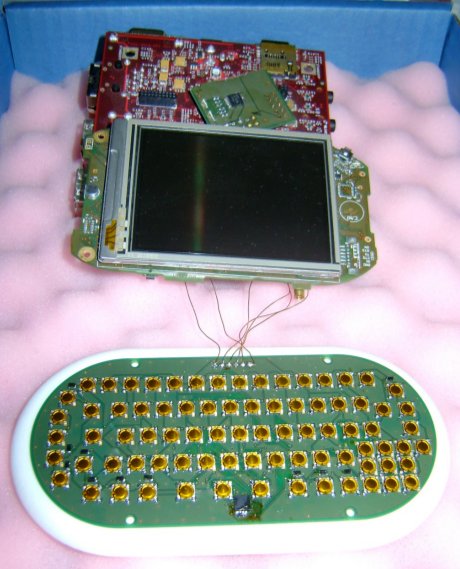
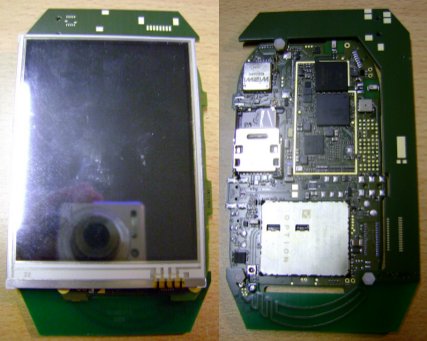
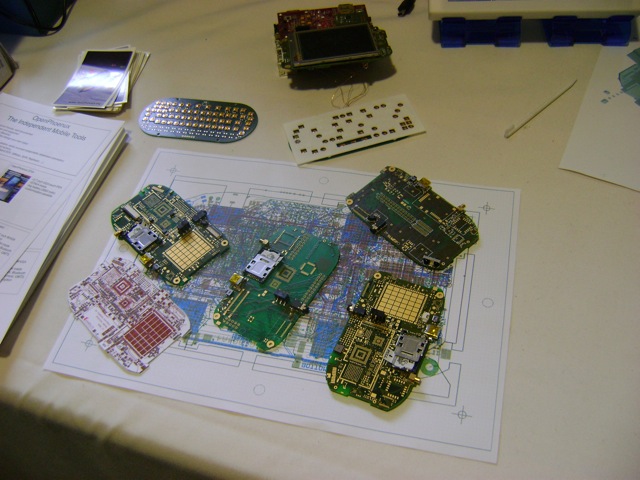
Next, they started to integrate all of this onto a single PCB of the same size as the Neo 1973/Freerunner boards, so it could fit into their cases, use their batterys, antennas, speakers, buttons and touchscreens. This board was then called GTA04A2 – the second prototype, which had quite some problems. A redesign of that prototype resulted to the GTA04A3 “Early-Adpoter” boards, which were shipped to about 20 develpoers, enabling them to start with software development for the platform. The next step was to reach out to the people by presenting the project on other conventions like the FOSDEM 2012, Openmobility 2012, Linuxwochen 2012 and the LinuxTag 2012, to produce bigger batches of GTA04s. To finance the first production run of the GTA04A4 (which includes some more fixes over the GTA04A3) Goldelico collected pre-orders from interested people from the Openmoko community. They were able to collect about 250 pre-orders and were thus able to start the first big OpenPhoenux production run.
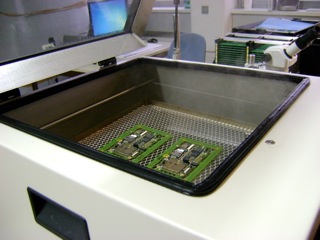
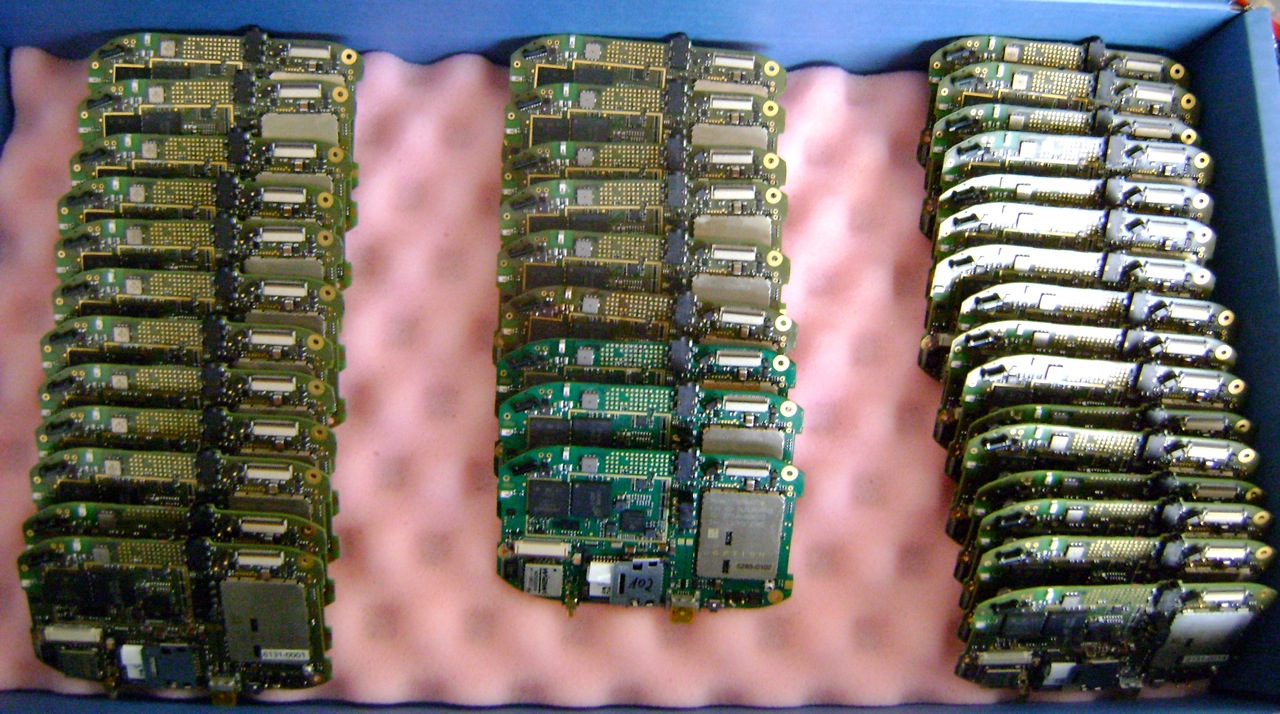
GTA04 Boards in vapour phase soldering machineUnfortunately, “mass”-production turned out not to be an easy task. Goldelico had to find, analyse and solve a lot of problems within the production line and especially in the soldering process, which took a lot of time. Because of all the troubles the people who pre-ordered in the beginning had to wait about 1 year to finally get their devices. At the end of 2012 all problems were solved and the “Group-Tour” had successfully finished. The GTA04 team is very happy to have reached that big milestone. Now that there are about 300 GTA04s (A3+A4) out in the wild, the interest in the Linux/FOSS community seems to be growing for our project. To satisfy that growing demand Goldelico will happily produce more GTA04s of revision A5 (which will include some minor fixes over the A4).
“Now as we have finally learned everything about mass production […], it is time to kick-start the next [production run].” (Dr. Schaller, Golden Delicious Computers)
Next production run (2013) – Out now!
To finance the 2nd production run of about 200 more GTA04 boards Goldelico started to collect pre-orders just recently. The production should run smoothly that time, as there were no big changes and the process is known. Production will start in march 2013 and the boards should ship shortly after that.
If you’re interested in pre-ordering one of those new A5 boards, check out the Handheld-Linux store. If you’re interested in getting a complete “Letux 2804” unit (GTA04 board build into an Openmoko Freerunner case) now you can get it from the first OpenPhoenux reseller Pulster.eu (stock is limited!).
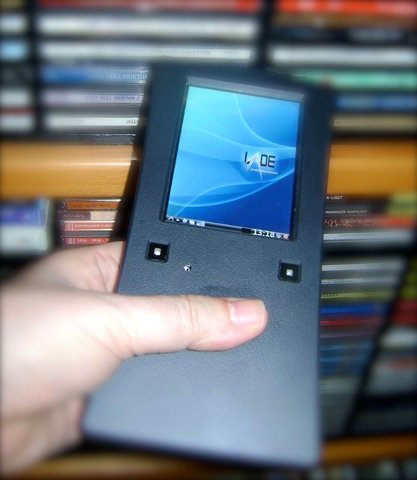
While preparing the next revision of the GTA04 and solving production problems, the guys at Goldelico started to experiment with other GTA04 powered devices. So it is no secret, that there is already an open GTA04 tablet prototype (Letux 7004) and the ready to use GTA04 professional PDA (Letux 3704), which can be used e.g. in logistics (RFID), measurement (GPS) or guiding tasks (big sunlight readable screen & long lasting battery).
The software for the GTA04 is already in a good shape as well. Besides the Debian (squeeze) hardware-validation image, there is the Debian based QtMoko distribution and the FSO based SHR distribution, which makes the GTA04 useable as a daily phone. Furthermore, a port of Replicant (fully open source Android) is in the works. All in all the GTA04 owners in the OpenPhoenux community seem to be satisfied with their devices, so is Nikolaus Schaller from Goldelico:
“[…] I enjoy every day to be member of this OpenPhoenux community. Let’s make the OpenPhoenux fly to new levels next year!” (Dr. Schaller, Golden Delicious Computers)
I really appreciate to see our community grow again and can just second Nikolaus’ sentence. I wish the community a successful year 2013, in which we can satisfy a lot of free software enthusiasts and freedom lovers needs. OpenPhoenux – Free your phone!
Some more Goodies
There are still some more goodies in the pipeline… So stay tuned!
Soon this years Open Hard- and Software Workshop (OHSW) will take place in Garching (near Munich) at the TUM Campus Garching. There will be a lot of intetresting topics to discuss and people to meet. Make sure to drop by if you find some time!
The agenda and further details are now available online:
The OpenPhoenux GTA04 production is finally making nice process. All the GTA04A4 (Group Tour 1) preorders should be ready and shipped soon!
This is the lastest batch of devices, which has sucessfully passed Golden Delicious Computers’ QA process and fulfilled the high quality claims.
After a lot of production issues had to be solved in the last months, we’ve now found a method which provides us with a good production yield. After switching to vapour phase soldering [0], we got rid of most the soldering problems.
GTA04 boards in the vapour phase soldering machine (1/2)GTA04 boards in the vapour phase soldering machine (2/2)
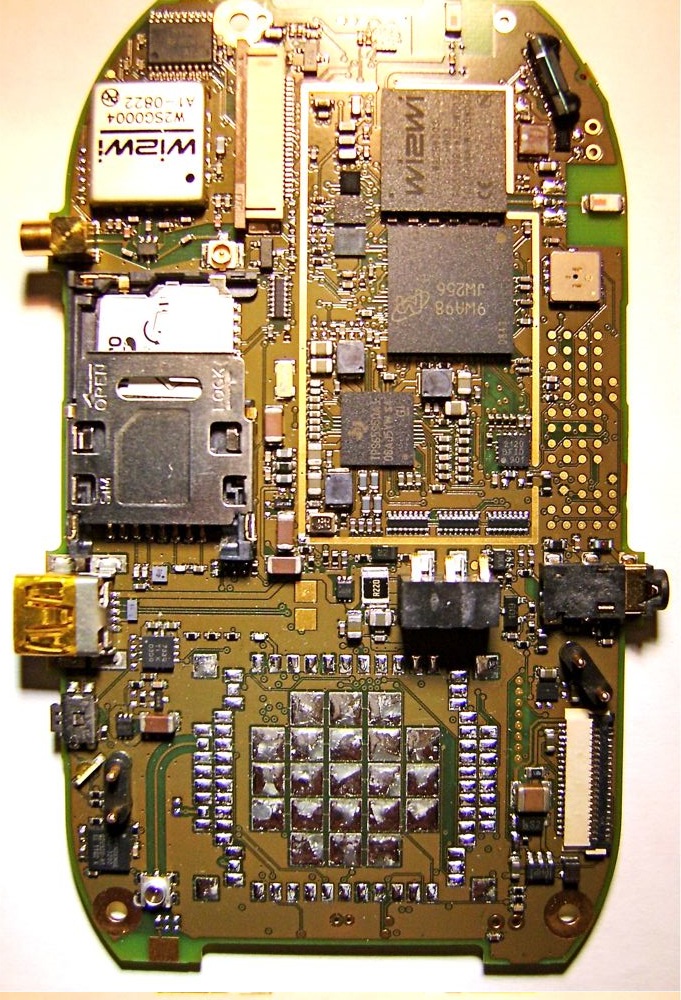
The OpenPhoenux project by the german company “Golden Delicious Computers” (goldelico) is creating a fully free software compatible mobile handheld plattform, based upon an open hardware design. The first step was to design a motherboard fitting the Openmoko Neo Freerunner, so owners of Openmoko phones could “upgrade” their devices to state of the art hardware.
To finance the production of the first big batch of GTA04 boards, goldelico collected preorders of interested people [0]. This “Group Tour” enabled them to start production of about 200 boards, which started to ship to it’s new owners in May 2012 and the last ones are going to be shipped in the coming weeks. Now – about one year and a lot of production complications later – the first batch of GTA04A4 boards is finished [1] and the next one is being prepared [2]. It will include the new GTA04A5 board design, providing some minor bug fixes, and a now working production process.
If you’re interested in one of the new GTA04A5 boards, please subscribe to the OpenPhoenux-Community mailinglist, to get notified about the next production batch and the next round of preorder collection.
It is also possible to register your non-binding interest in one of the new GTA04a5 boards, by using the “Wishlist” functionality, this enables goldelico to estimate the demand and thus the next batch’s size.
The Letux 2804 is a smartphone providing a 2.8” touchscreen and a GTA04 core. It’s case can be produced by a 3D printer. Technical Specifications:
800 MHz / 1GHz ARM Cortex-A8 processor
PowerVR SGX integrated graphics
2.84” (43mm x 58mm) VGA touchscreen
HSDPA 3G modem
512MB RAM
512MB internal memory + micro SDHC up to 32GB
WLAN, Bluetooth, GPS, FM Transceiver
Accelerometer, Compass, Gyroscope, Barometric Altimeter, Camera
USB 2.0 port, 2.5mm headset port, GPS antenna port, video out
QtMoko, SHR, Android (Replicant), Debian, …
Letux 7004 – Tablet
The Letux 7004 is a free software centric tablet, powered by a 7.0” touchscreen and the same GTA04 core, as it’s small brother Letux 2804. This tablet was developed while solving the GTA04 production problems and is in the prototyping phase at the moment. So it’s not yet ready to order, unfortunately. Technical Specifications:
USB 2.0 port, 3.5mm headset port, Ethernet port, GPS antenna port, video out
QtMoko, SHR, Android (Replicant), Debian, …
If you’re interested in high quality open hardware, “Made in Germany”, which is fully compatible with you favorite free and open source software, you should definitely track the projects mentioned above and jump in to get one of those great devices once you’re ready. I’m absolutely satisfied with my GTA04A3 early adopter board, which I’m happily using since over one year!
I took part in the “LPI Linux Essentials” Beta program at LinuxTag 2012 in Berlin (May 23rd, 2012). Today I got my official certificate, finally. I’m now recognized as an approved Linux and Open Source enthusiast and supporter:
In my opinion the Linux Essentials program is a nice thing, especially it’s intention to get young people at school in touch with the basics of computers and the ideals of Linux and Open Source Software. I hope the Linux Essentials recognition will broaden, now that it is officially started and find it’s way into more schools.
This video shows the Openmoko/Goldelico GTA04 booting SHR Linux in 17 seconds. Note: SHR is not yet optimized for a fast bootup on the GTA04.
Got interrested?
If you’re interrested to participate in this open hardware and free and open source software effort, please jump in:
Get your GTA04 now by participating in the GTA04 Group Buy Tour.
The video shows the GTA04 board booting and running the QtMoko GNU/Linux distribution which is based upon Debian GNU/Linux and optimized for smartphone usage. Furthermore it shows an early version of the 3D printed GTA04 case, which can easily be modified to everyones needs and ordered at Shapeways.
If you’re interresed in this awesome project, please have a look at its project page www.gta04.org and take part in the GTA04 Group Buy Tour.
 FOSDEM 2013 is over and I had a really nice time again at Brussels, together with the OpenPhoenux/GTA04 team. It was especially nice to meet some people from our community in person and discuss interesting ideas with them.
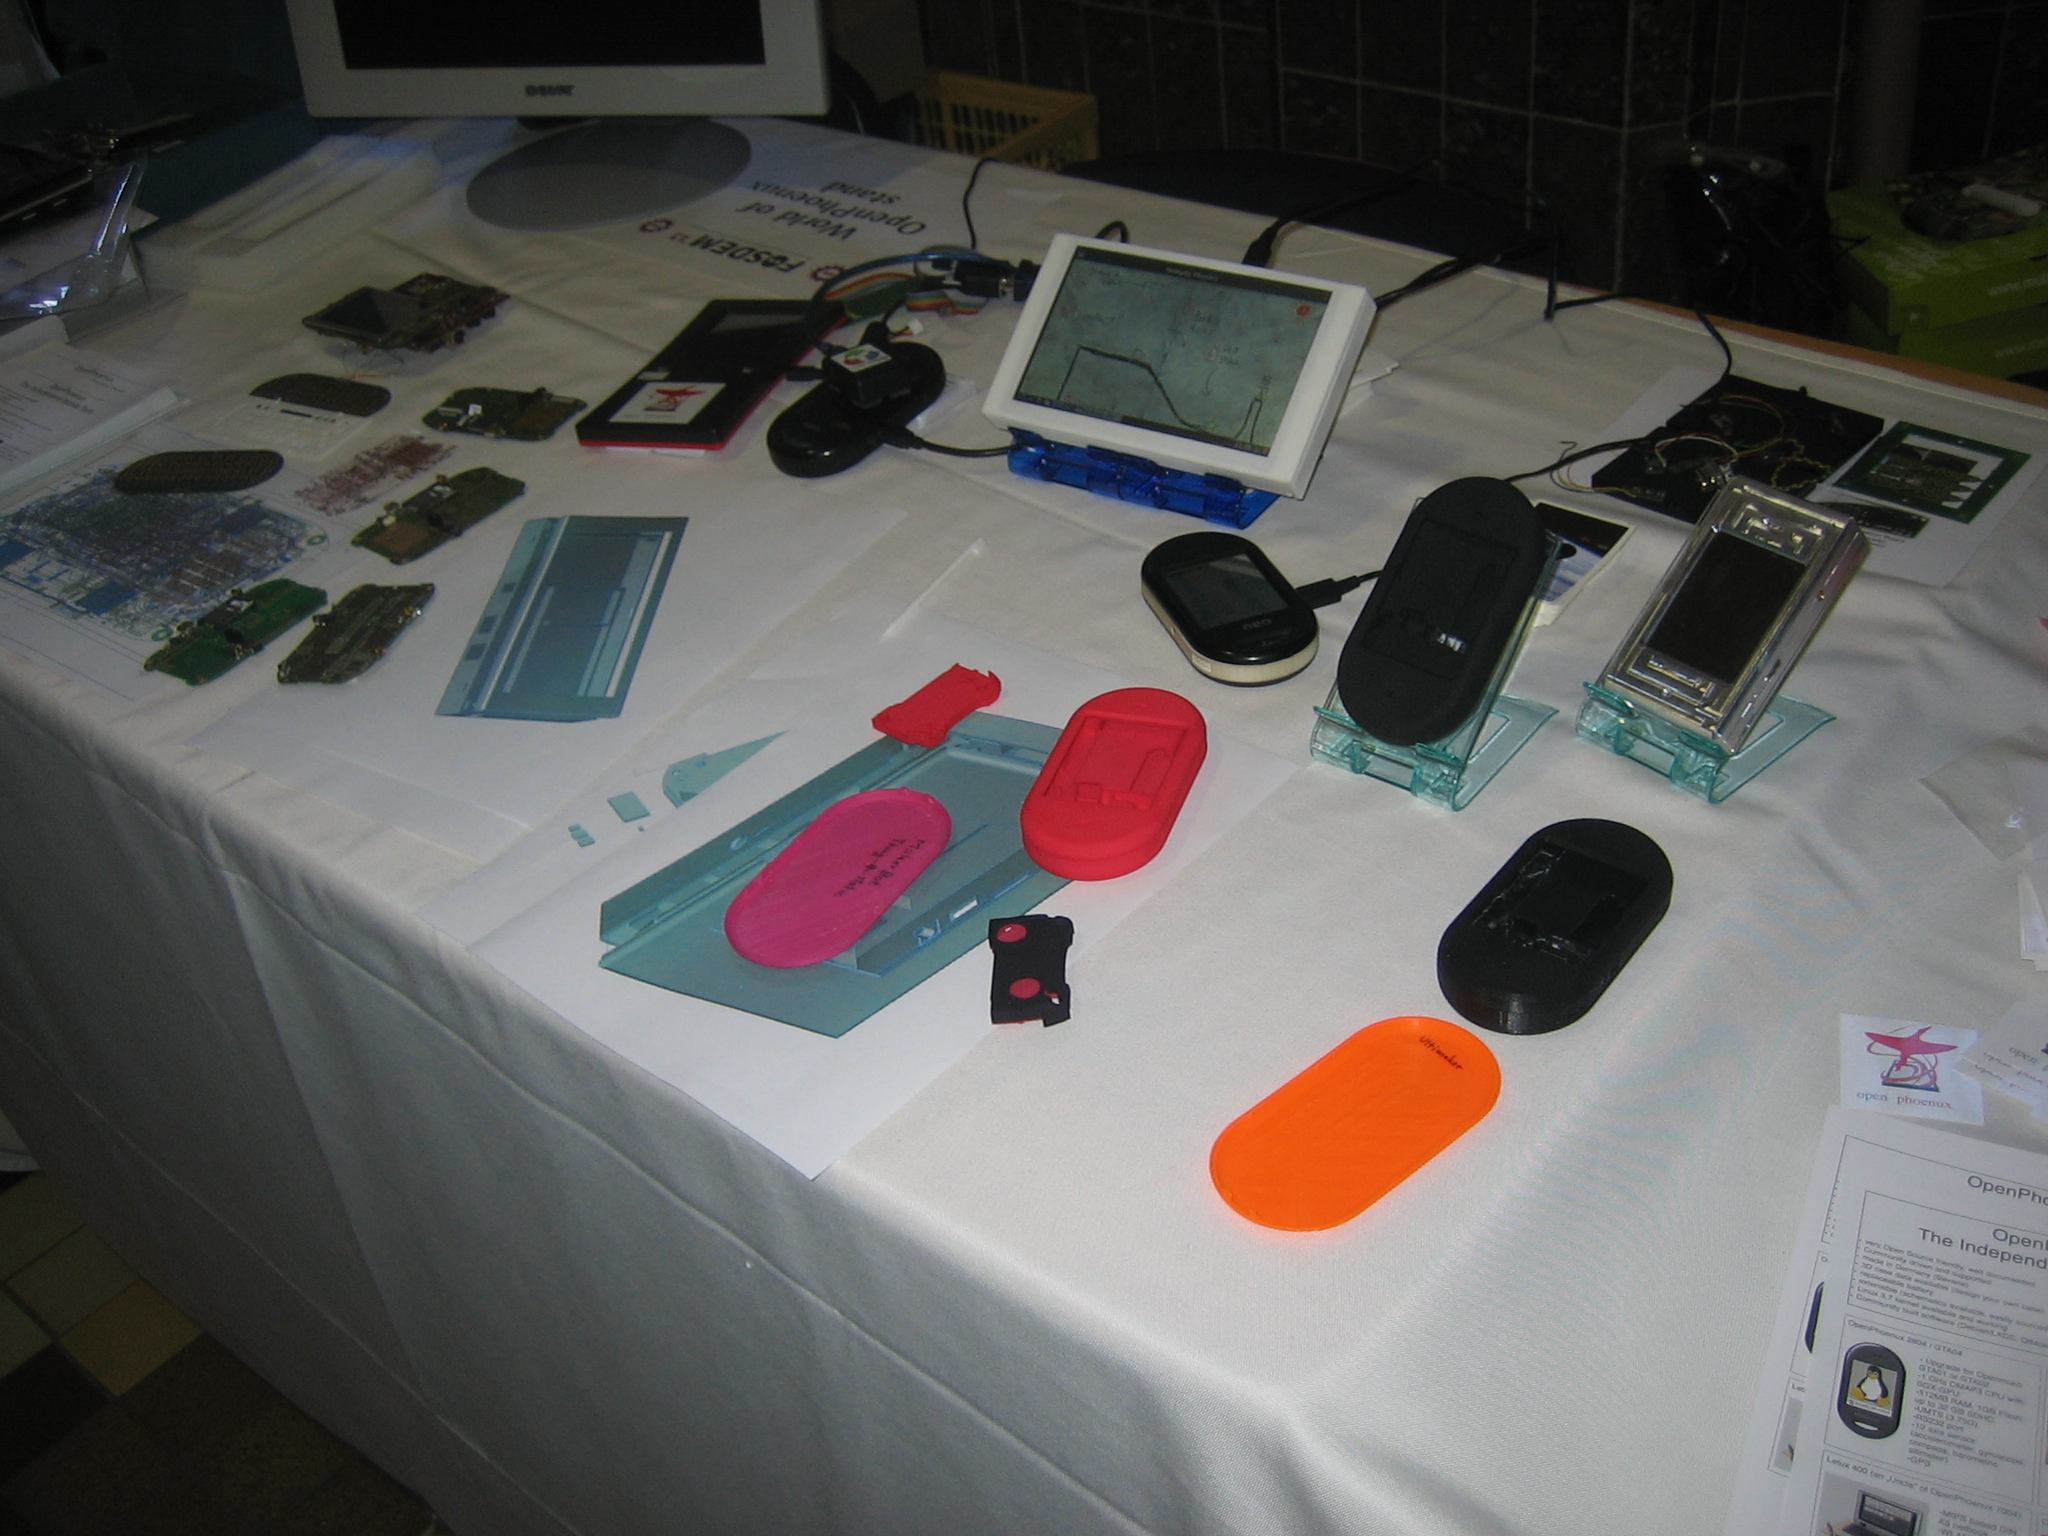


 All started off after